BIMS: Field Book Management
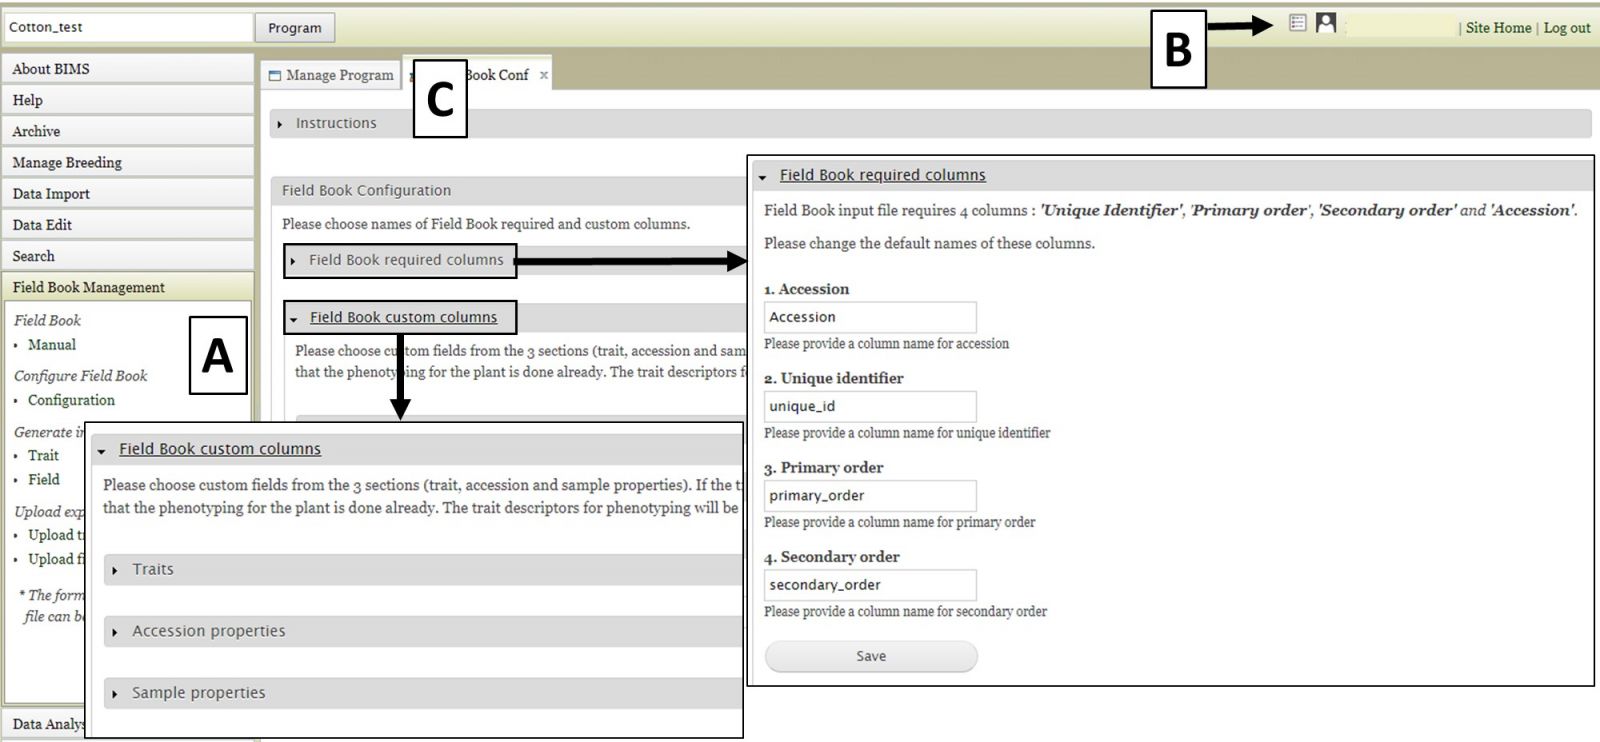
For breeders using the Field Book App, BIMS can help generate the trait and field input files to configure Field Book for data entry and BIMS can also import data in the trait and field files from Field Book. For ongoing trials, BIMS can also help breeders sync data between different devices by loading the exported data from multiple devices into BIMS and generating an input file with combined information. When breeders first create their programs, they have chosen the names for the four required columns. These columns must match the column names in the Field Book Input file. The configuration settings are accessed either by clicking on "Configuration" under the "Field Book Management" section on the left-hand accordion menu (Fig. 24A) or by clicking on the icon in the header (Fig. 24B). On the "Configuration" tab (Fig. 24C) there are two sections; "Field Book required columns" and "Field Book custom columns". The first section is to set names for Accession and the three required columns in Field Book Input file, the second section is for users to choose the optional columns that they want to add in the Field Book Input file. When they generate a Field Book Input file, these optional columns will show up for breeders to choose for each Field Book Input file that they generate.
Figure 24. Field Book configuration options
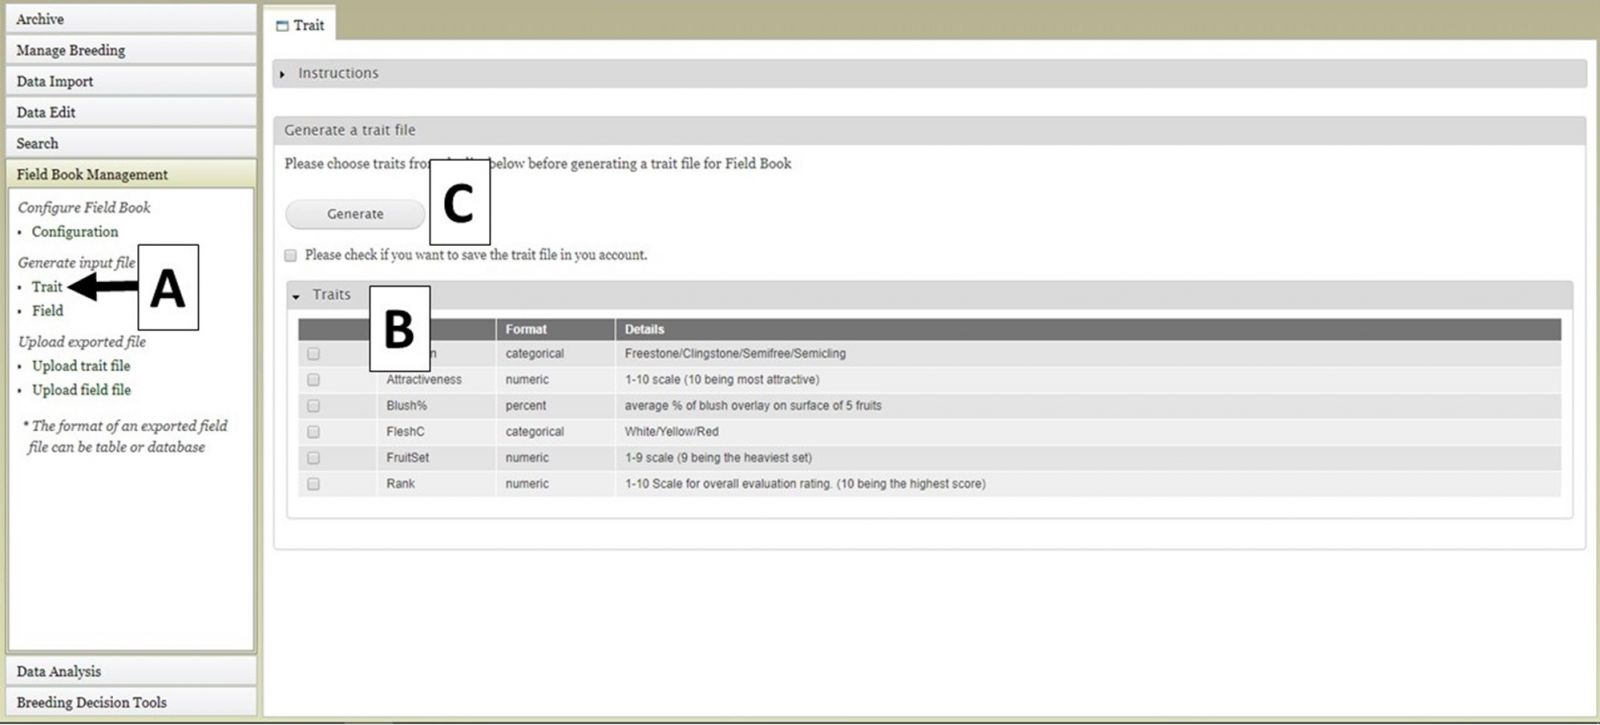
Two different file types for input into Field Book can be generated using BIMS. The first file type is the Trait (.trt) file when breeders want to add traits to Field Book using a file instead of creating them one by one in the Field Book App. This file contains the details of the phenotypic traits being recorded. To generate this file, click on "Trait" (Fig. 25A) and the "Trait" tab will open. On the "Trait" tab, there will be a list of traits that have already been loaded into the program on BIMS (Fig. 25B). Select the traits you want to export and then click the "Generate" button (Fig. 25C). A .trt file will then download.
Figure 25. Generating Trait file for Field Book
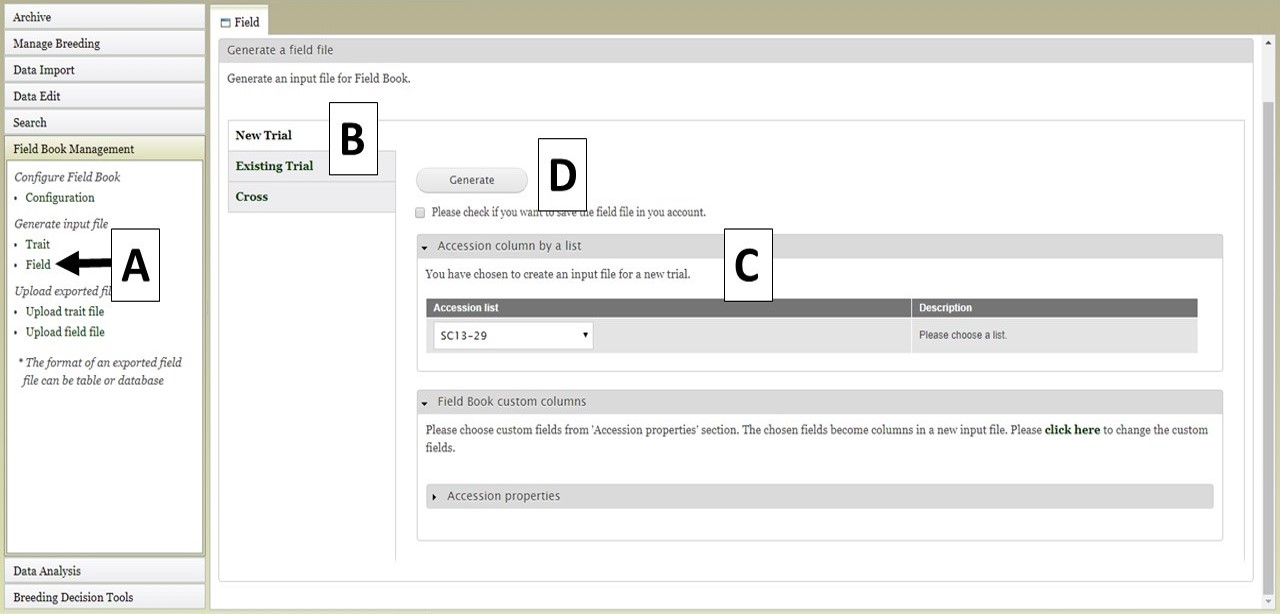
The Field file (.csv) can also be generated for import into Field Book. This file has the list of accessions and columns for the required columns (unique identifier, primary order, secondary order). The Field file is generated by clicking on "Field" (Fig. 26A) to open the "Field" tab. On the "Field" tab there are three options for generating the file (Fig. 26B). The first option is to generate a "New Trial". This can be used when breeders want to do another trail with accessions that are already in the database. If you have saved an accession list from a previous search (see Searching Data section), the option to use that list is available (Fig. 26C). You can also select other accession properties to add to the file. To generate the file, click the "Generate" button (Fig. 26D) and the file will download. In the generated file from this "New Trial" option, only the accession is provided and the three required colums (the unique identifier, primary order, and secondary order) will be empty since they depend on the planting design. The breeders should fill in those columns before importing into Field Book App.
Figure 26. Generating a Field file for a New Trial
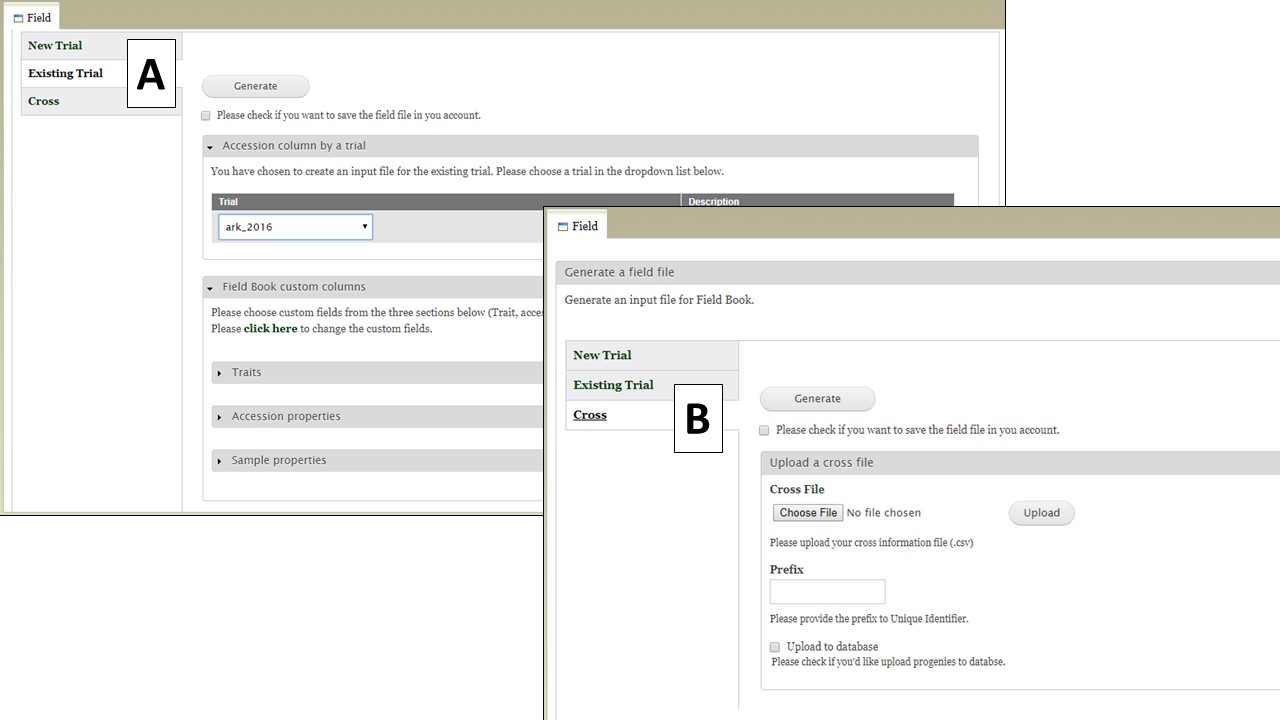
Field files can also be generated from an Existing Trial. Files from Existing Trials (Fig. 27A) contain the accessions from the existing trial that is selected as well as the custom columns the user chooses. This functionality is to provide a way to sync data from multiple devices that have Field Book App to check which individual has been phenotyped already. Breeders can first upload the data from multiple devices, then generate an updated input file from the existing trial with a trait value.
Figure 27. Generating a Field file from an Existing Trial or Cross
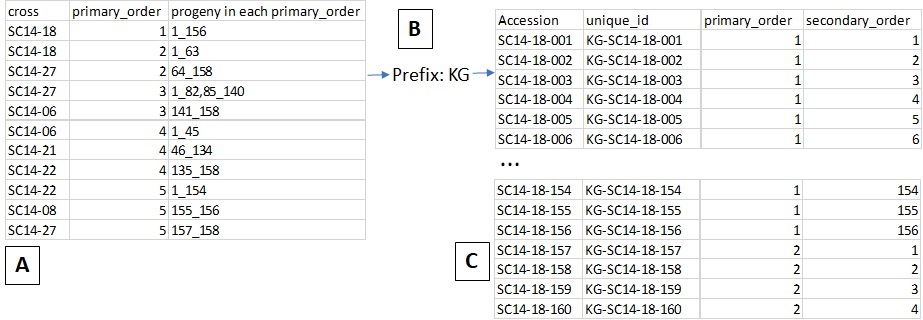
The Cross option (Fig. 28) allows you to generate an input file for a new cross. When users upload a file with information on the cross and the planting (Fig. 28A, eg. cross name, primary order, and progeny in each primary order) and type in a prefix for the unique id (Fig. 28B), then BIMS generates a Field Book input file with new progeny names and three required columns automatically filled in (Fig. 28C). In the uploaded file (Fig. 28A), the order of the columns is important, not the column head.
Figure 28. Example input file and output file for Generating a Field file for a new Cross
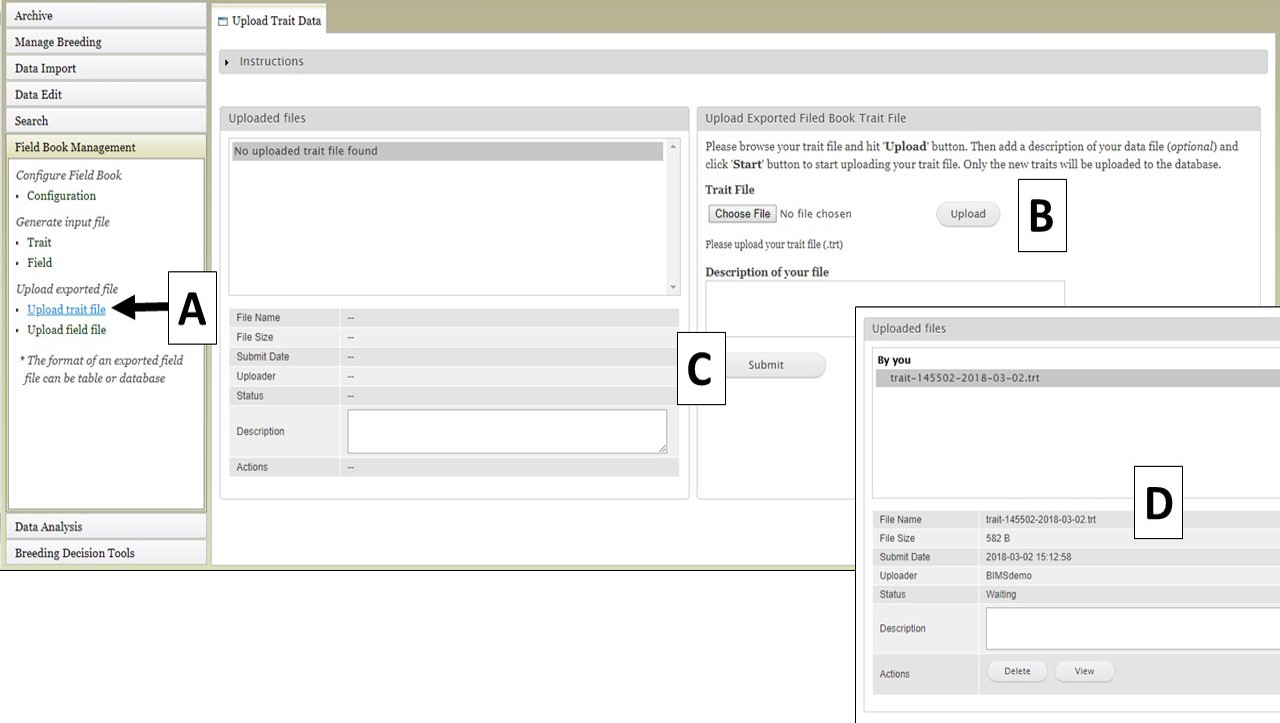
If you have already configured Field Book and would like to transfer the Trait and Field information to BIMS, that can be done by importing the Trait and Field files from Field Book. To import a Trait file, use the "Upload trait file" option (Fig. 29A). Select your file (Fig. 29B) and click "Upload." Once the file has uploaded, click "Submit" (Fig. 29C) to start the import job. The file then appears in the "Uploaded files" section (Fig. 29D).
Figure 29. Importing Trait files from Field Book into BIMS
Field files can also be imported into BIMS from Field Book. Click on "Upload field file" (Fig. 30A) and then upload the field file and click "Inspect" (Fig. 30B). After BIMS checks to see if the required columns are present in the Field file, the "Upload an exported field file" section appears (Fig. 30C) and the location and trial can be selected. The file upload job is then initiated by clicking "Submit". Successfully uploaded files will appear under "Uploaded files" (Fig. 30D).
Figure 30. Importing Field files from Field Book into BIM
.jpg)