BIMS (Breeding Information Management System)
BIMS: Accessing BIMS
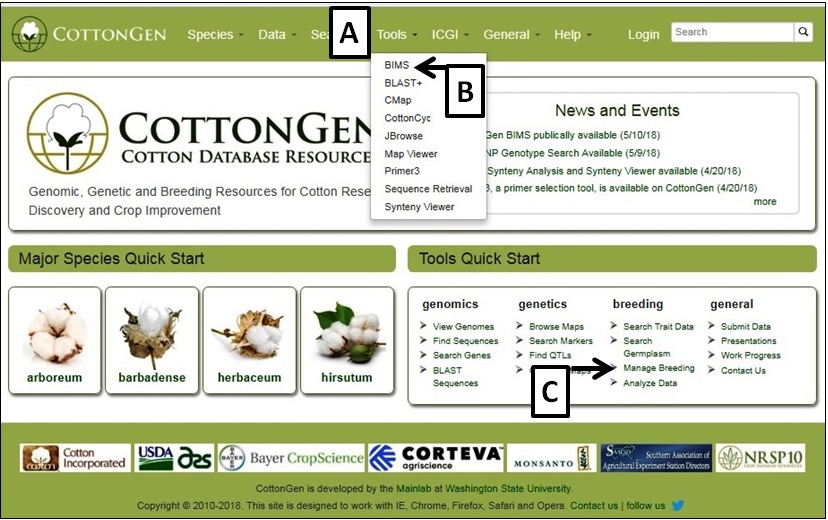
To access BIMS, either simply click on the "Tools" menu (Fig. 1A) and then select "BIMS" (Fig. 1B), or via the Manage breeding link on the Tools Quick Start (Fig. 1C) on the home page. The BIMS interface will then open. Public data is available for all users of CottonGen without requiring an account. Users can download public data from BIMS without an account, but will need a CottonGen user account to save the results. Access to private breeding data also requires users to login with their CottonGen user account. To create a breeding program, users need to create a CottonGen account and contact using the contact form for breeder privilege.
Figure 1. How to access BIMS on CottonGen
BIMS: Viewing Data
There are three main areas of the BIMS interface. The first part is the header region (Fig. 2A) which displays the current program, allows users to change their selected program, has a link to the CottonGen homepage (Site Home), and displays the user name. The second part of the interface is the accordion menu on the left side (Fig. 2B). This menu allows users to switch between different sections of the BIMS program. The last region is the tab region (Fig. 2C) and this is where users primarily interact with BIMS. Each tab in BIMS has an "Instructions" section that can be expanded by clicking on it. The "Instructions" have information on how to use that tab.
Figure 2. The main parts of the BIMS interface
.jpg)
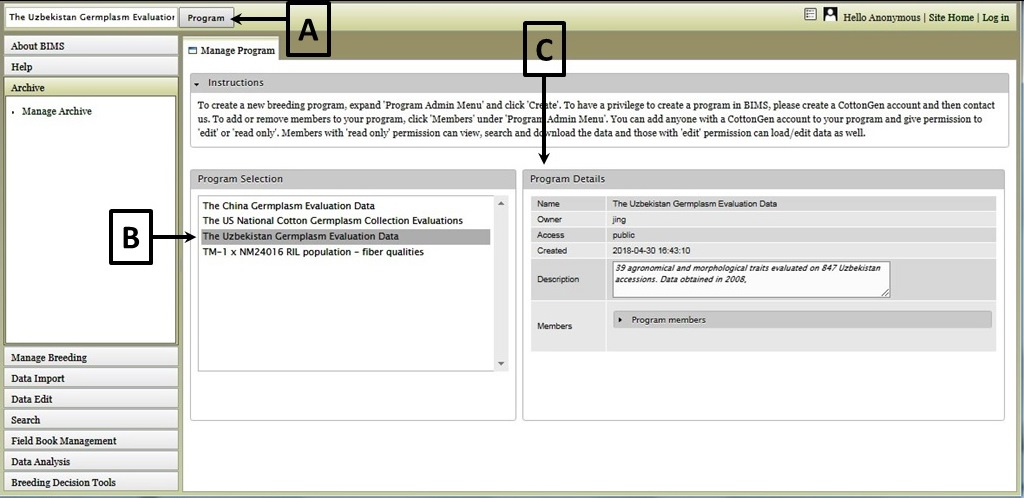
To view data that has already been loaded into BIMS, you first need to select a breeding program (Fig. 3A). Once selected, the program name will appear in the header of the BIMS window (Fig. 3A). You can change the program by clicking on the "Program" button next to the program name, then selecting a different program from the Manage Program window (Fig. 3B). Details of the selected program will be displayed once a new selection is made (Fig. 3C).
Figure 3. Selecting a Program in BIMS
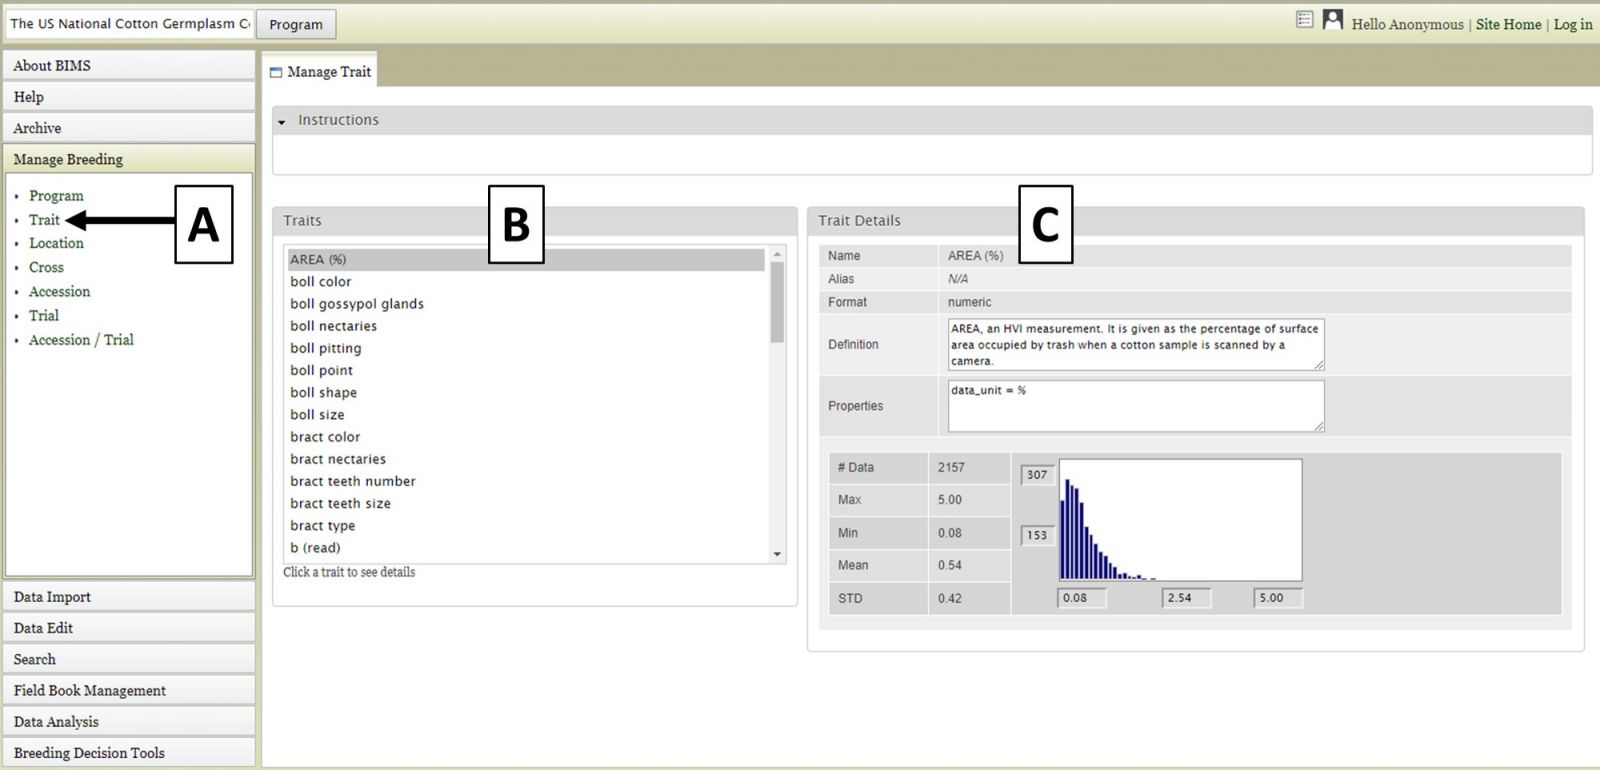
Once the program has been loaded, you can explore data that has been loaded into BIMS by clicking on the "Manage Breeding" section of the accordion menu. Under "Manage Breeding" there are links to view information about the Program, Trait, Location, Cross, Accession, and Trial. To view information about a certain trait, click on "Trait" (Fig. 4A) and the "Manage Trait" tab will appear. In that tab, click on the trait of interest (Fig. 4B). Once a trait is selected, the "Trait Details" will be displayed (Fig. 4C). If you are viewing data from a private breeding program, you can also edit the information for all the items under Manage Breeding. Breeders with private breeding programs will also see an "Actions" section under the details window. The "Actions" section allows breeders to edit the properties or delete the item.
Figure 4. Selecting and viewing Trait Details
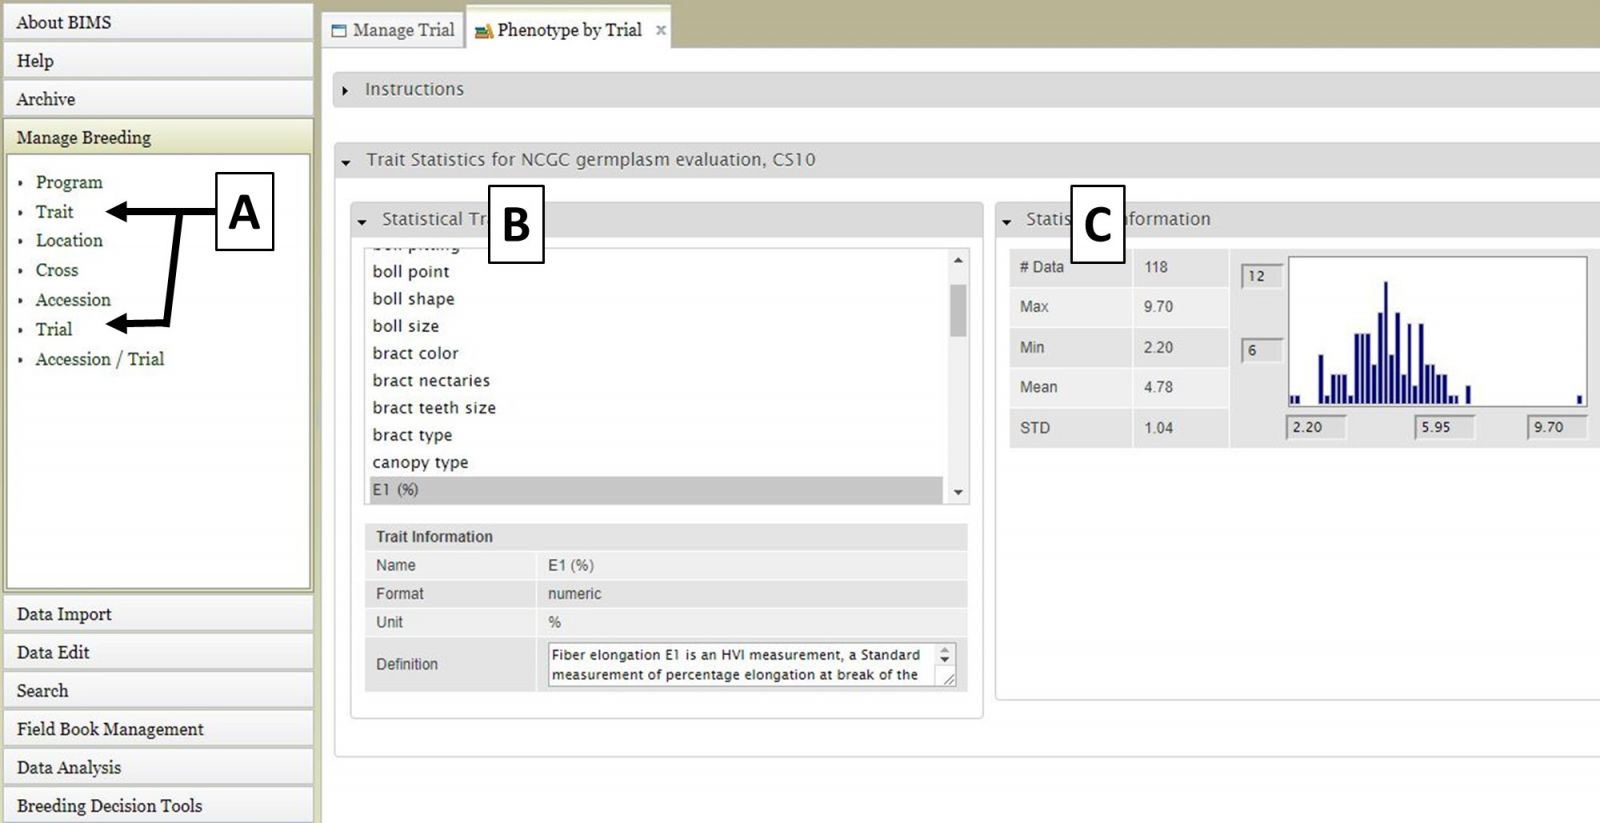
You can also view information specific to multiple data types, such as Trait data from a particular trial within a program. For example, in Figure 5 we are viewing E1 (%) trait data that is only from the CS10 trial of the US National Cotton Germplasm Collection Evaluations program. To do this, you would select Trial from the accordion menu (Fig. 5A) and then "NCGC germplasm evaluation, CS10" and click "View" in the tab area, then select Trait from the accordion menu (Fig. 5A) and finally choose E1 (%) from the tab area (Fig. 5B). Details will be displayed to the left (Fig. 5C).
Figure 5. Viewing data specific to multiple data types
For the "Cross", "Accession", and "Trial" data types, the data details are accessed the same way. First select the data type under "Manage Breeding" (Fig. 6A), then select one of the names (Fig. 6B), and then the details will appear (Fig. 6C). For these data types, in the "Details" section there is also a "View" button that opens another tab that displays further statistics/data.
Figure 6. Location details

BIMS: Searching Data
You can search the data in a breeding program using BIMS. Click on the "Search" section of the left side accordion menu and then click on "Accession" (Fig. 7A). This will open the "Search Accession" tab (Fig. 7B).
Figure 7. Opening the Search tab
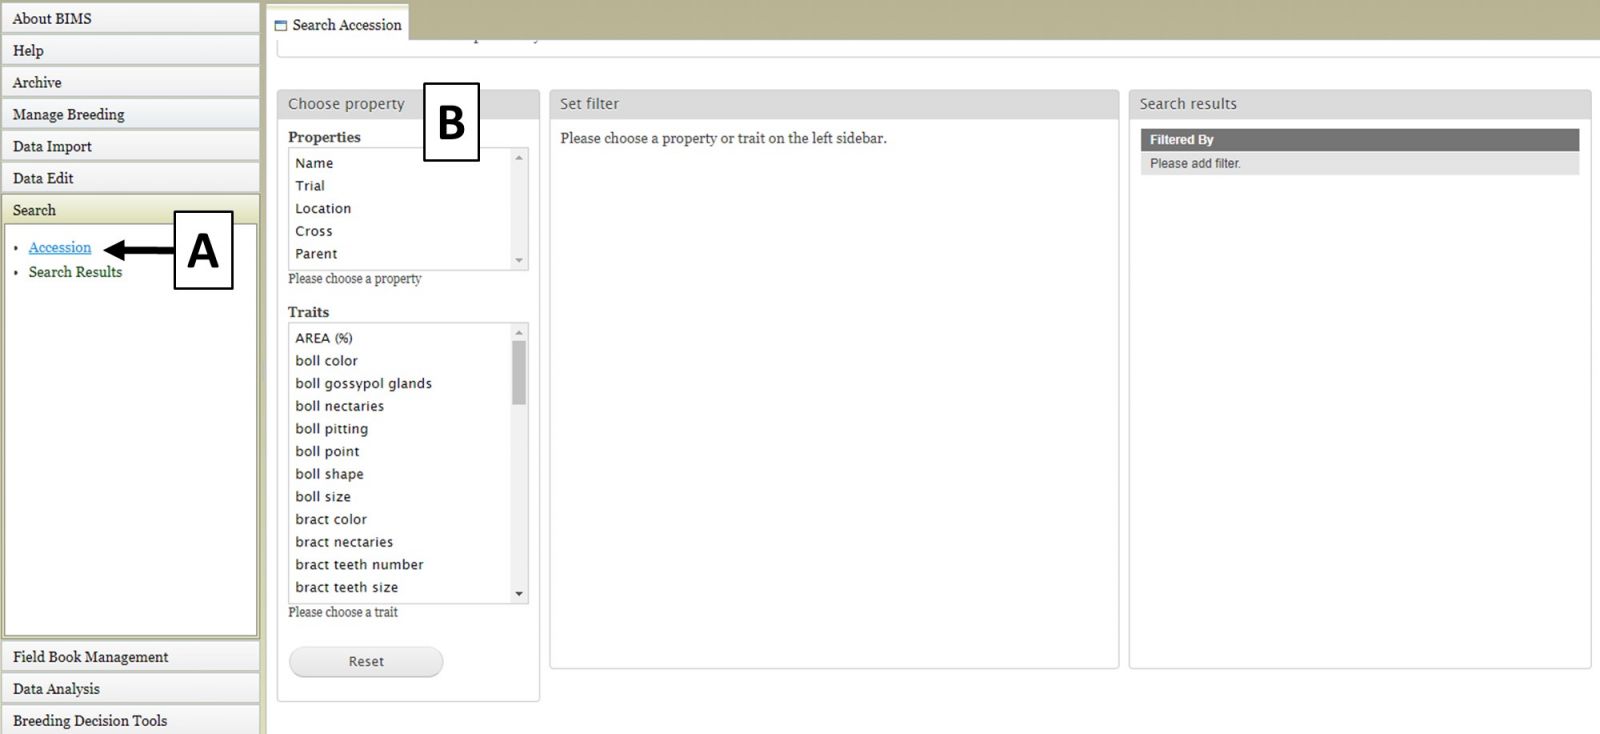
The first step to start a search is to select a property or trait under the "Choose property" section (Fig. 8A). In this example, we are choosing "Parent." After the property is selected, the "Set filter" section will populate with options for that data type (Fig. 8B). After selecting the options you want, click "Add." The selected filter will then appear in the "Search results" section. If you want to reset the search, click the "Reset" button (Fig. 8C).
Figure 8. Selecting a Property and setting a Filter in the Search Tab
.jpg)
You can further filter the search results by adding another property or trait under the "Choose property" section. In this example, we are further refining the search by adding the "boll color" trait (Fig. 9A). The "Set filter" section will show the data that are relevant for the previous filter you chose. For example, the statistics shown for "boll color" trait here is only for those accessions from the parents you chose in the previous search. You can choose which values for boll color to filter by, or for data that is numerical you can set the minimun and maximum value for that trait, and then click "Add" (Fig. 9B). The new filter is added to the "Search results" section and the selected filters can be removed with the "Remove" button under "Search results" (Fig. 9C). To view the search results, and to generate a file to export, click on "View" under "Search results" (Fig. 9C).
Figure 9. Adding more filters to the search and viewing results
.jpg)
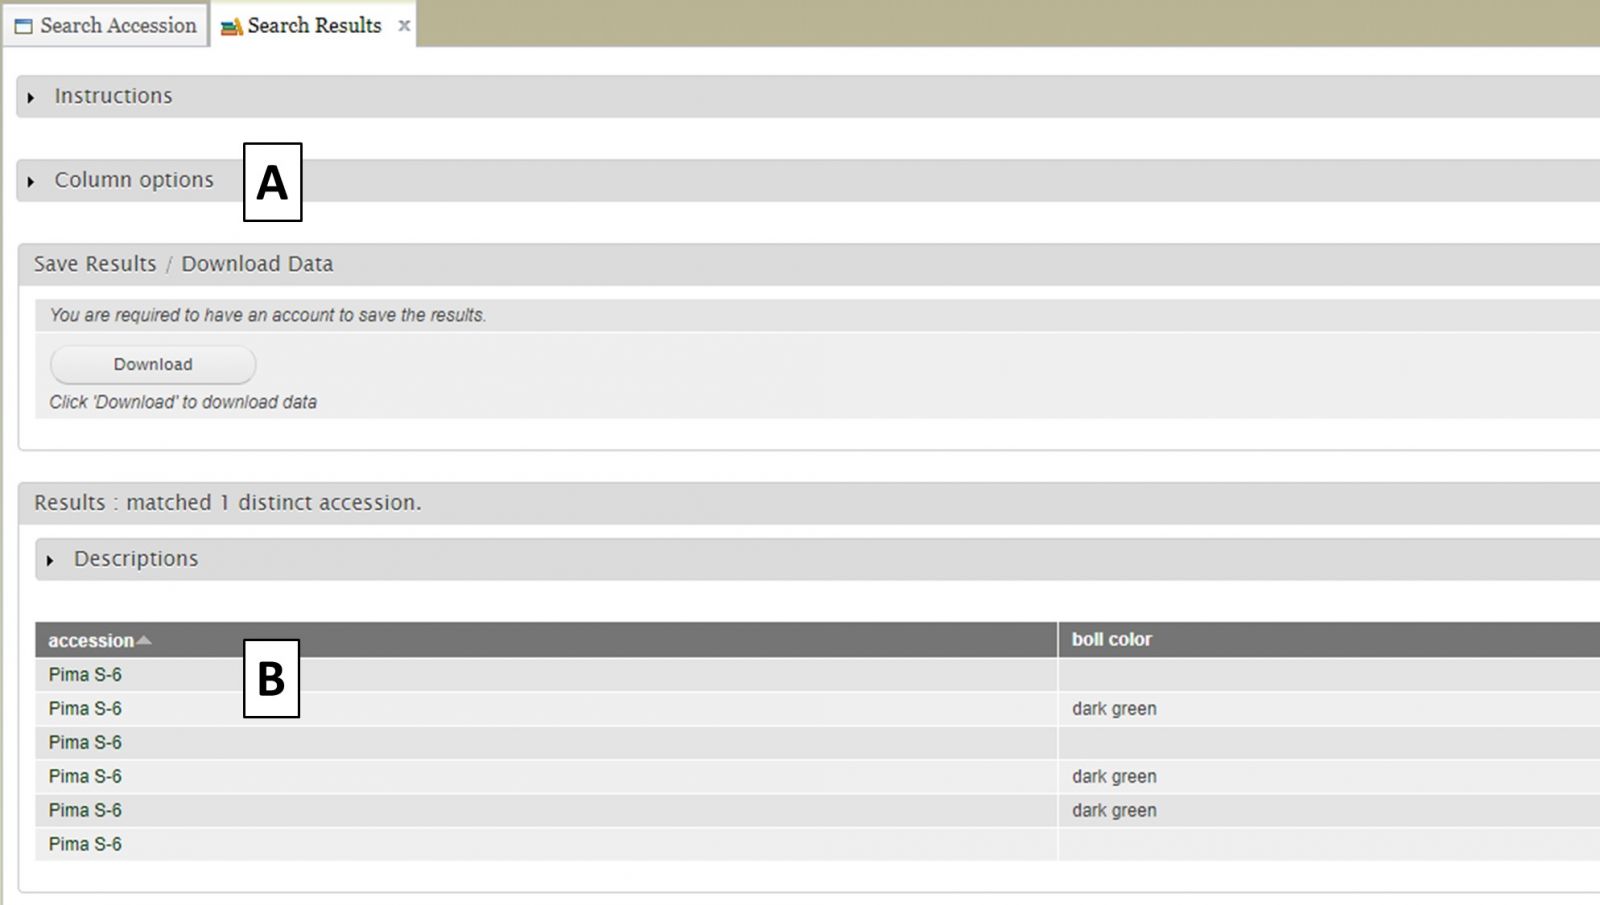
When the "View" button is clicked (Fig. 9C), a new tab opens called "Search Results" (Fig. 10). On this tab there is a "Column options" section (Fig. 10A) and a preview of the data table (Fig. 10B).
Figure 10. Search Results tab
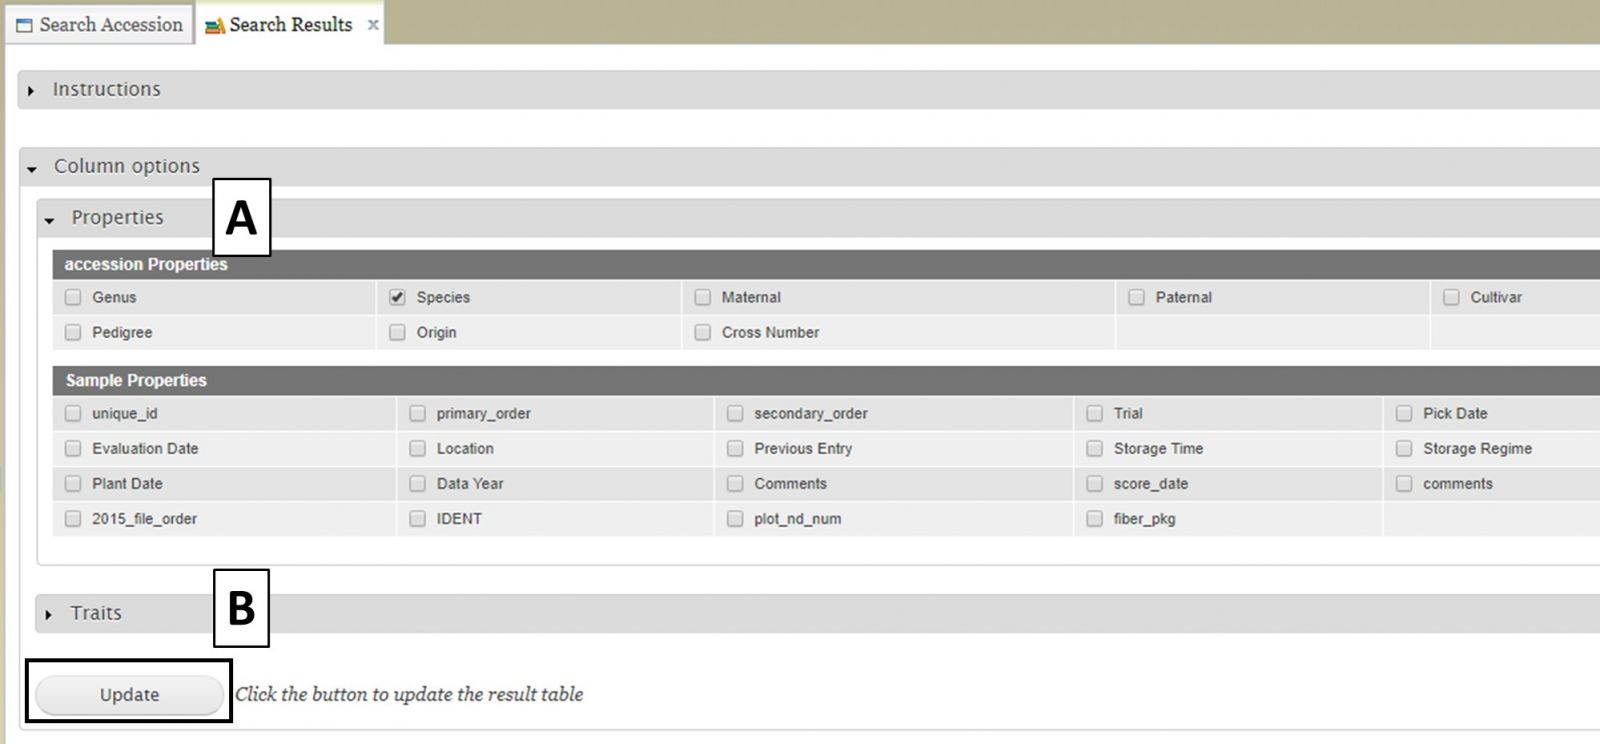
Users can add more information to the table before exporting the data. To do this, click on the "Column options" section to expand it (Fig. 11). There are two sections, "Properties" (Fig. 11A) and "Traits" (Fig. 11B). You can select additional items to display by clicking on the check boxes in these two sections. Once all the selections have been made, click "Update".
Figure 11. Adding more columns to search results table with Column Options section
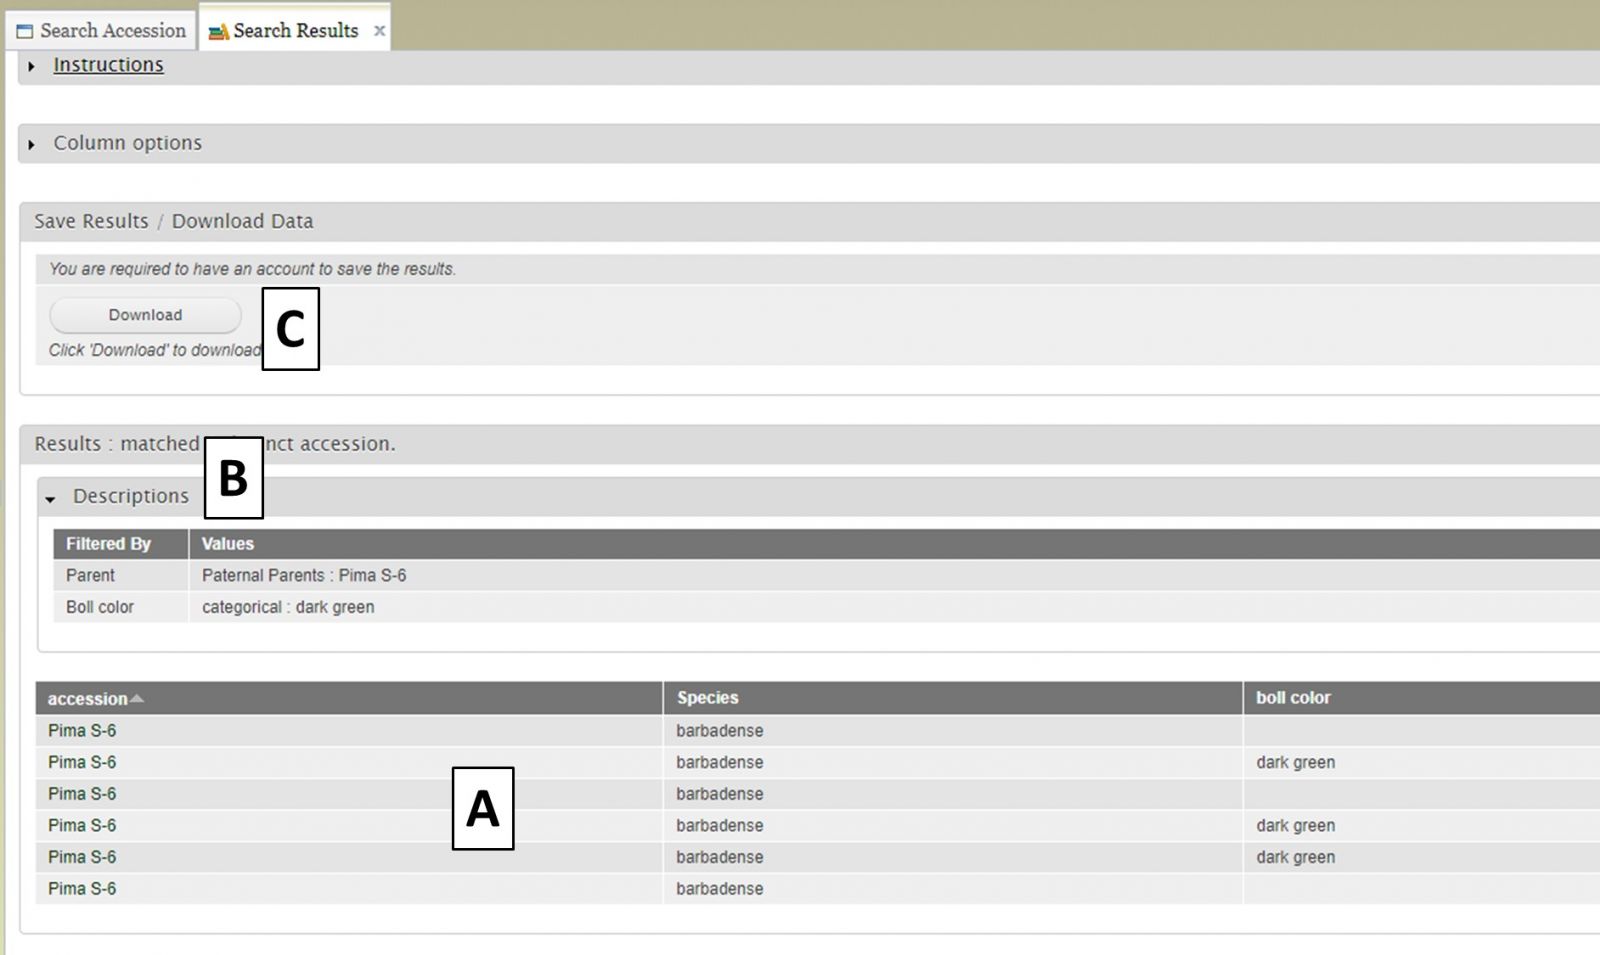
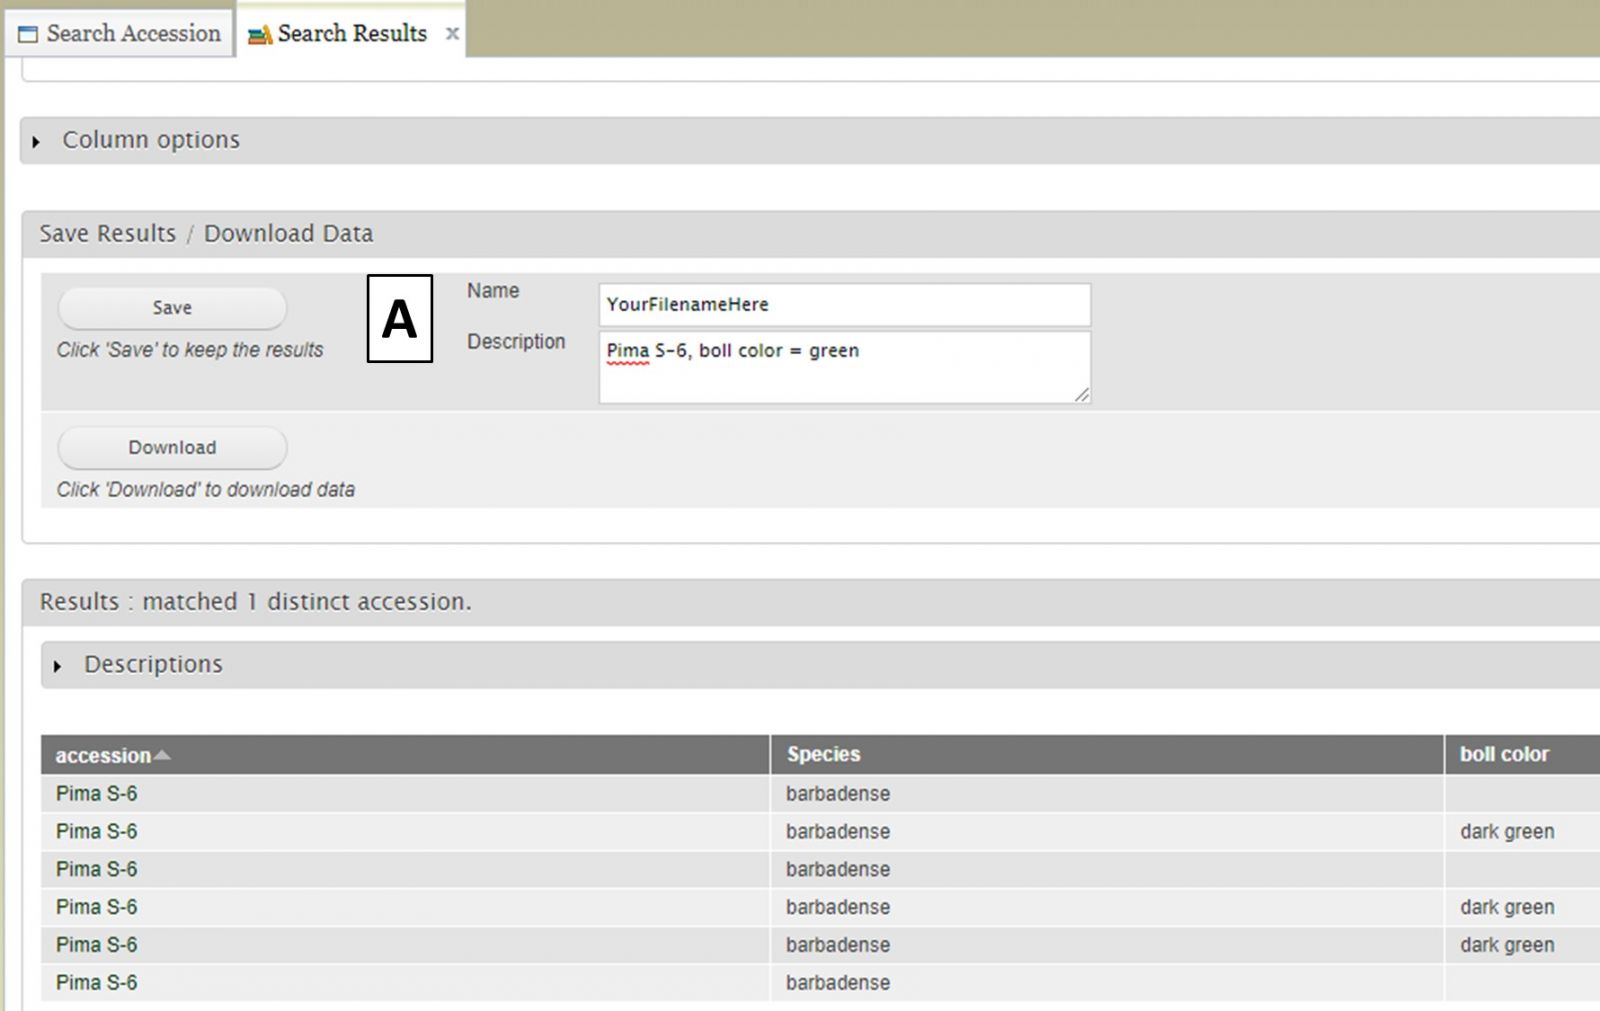
After selecting additional data to display on the table, you can preview the table on the "Search Results" tab (Fig. 12A) and see the original filters that were used to generate the initial table by clicking on "Descriptions" in the "Results" section (Fig. 12B). To download the data table, click on the "Download" button in the "Save Results / Download Data" section (Fig. 12C). If you do not see your browser start to downoad the file after clicking "Download," please make sure the pop-up was not blocked.
Figure 12. Downloading data from the Search Results tab
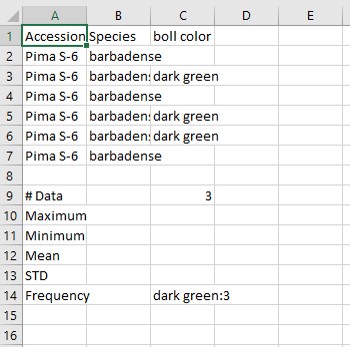
BIMS generates a CSV file of the search results table (Fig. 13). This table is easily opened by Microsoft Excel and other programs.
Figure 13. Example CSV file exported from BIMS
If you have a CottonGen account, you can also save the search results to a list. You will see a "Save" button with boxes for a list name and description (Fig. 14A). This list can be saved to either a private or public program that you are in.
Figure 14. Saving lists from searches to private breeding programs
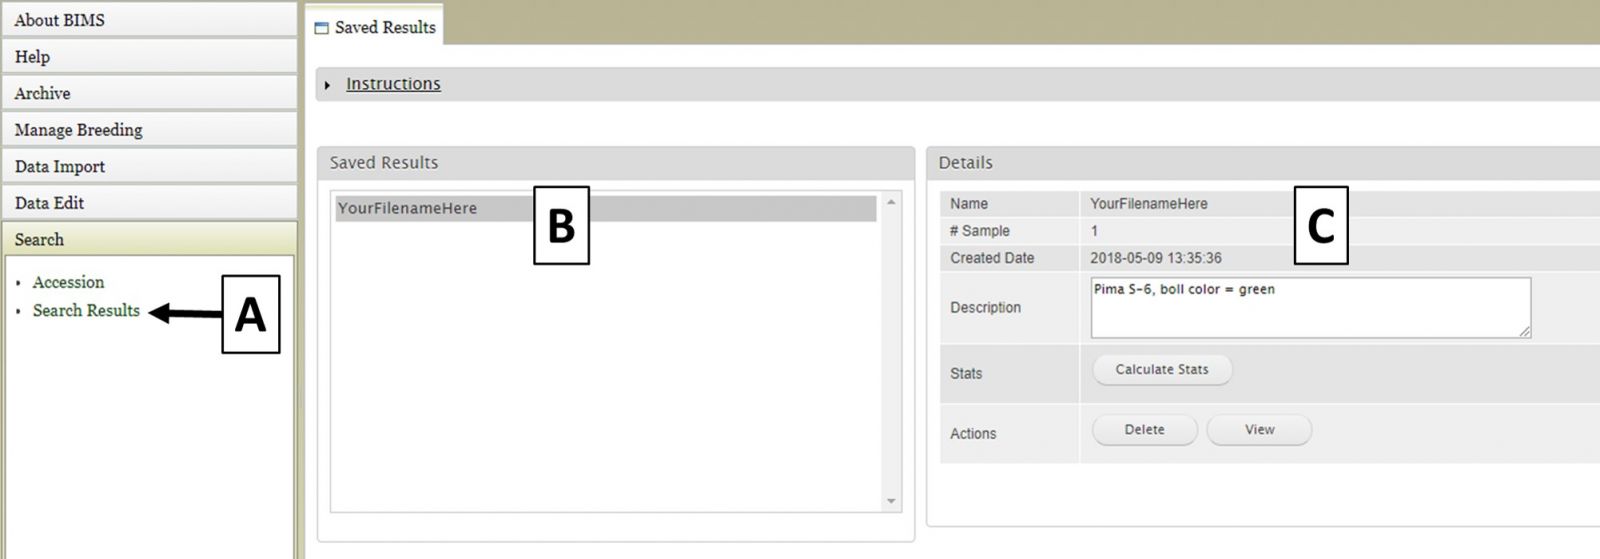
Saved search results are accessed by clicking on "Search Results" in the "Search" section of the accordion menu (Fig. 15A). Any search results you have saved will appear unded "Saved Results" (Fig. 15B) and you can also see details about the saved lists and delete, view, or edit them (Fig. 15C).
Figure 15. Accessing saved search results
BIMS: Creating a New Breeding Program
To start a new breeding program in BIMS, you must have a CottonGen account with the appropriate access level. Once you have that, select "Program" under Manage Breeding from the accordion menu (Fig. 16A). This will open the "Manage Program" tab and then you can open the "Program Admin Menu" section (Fig.16B). Click "Create" to make a new program.
Figure 16. Switching crops and opening the Manage Program tab
.jpg)
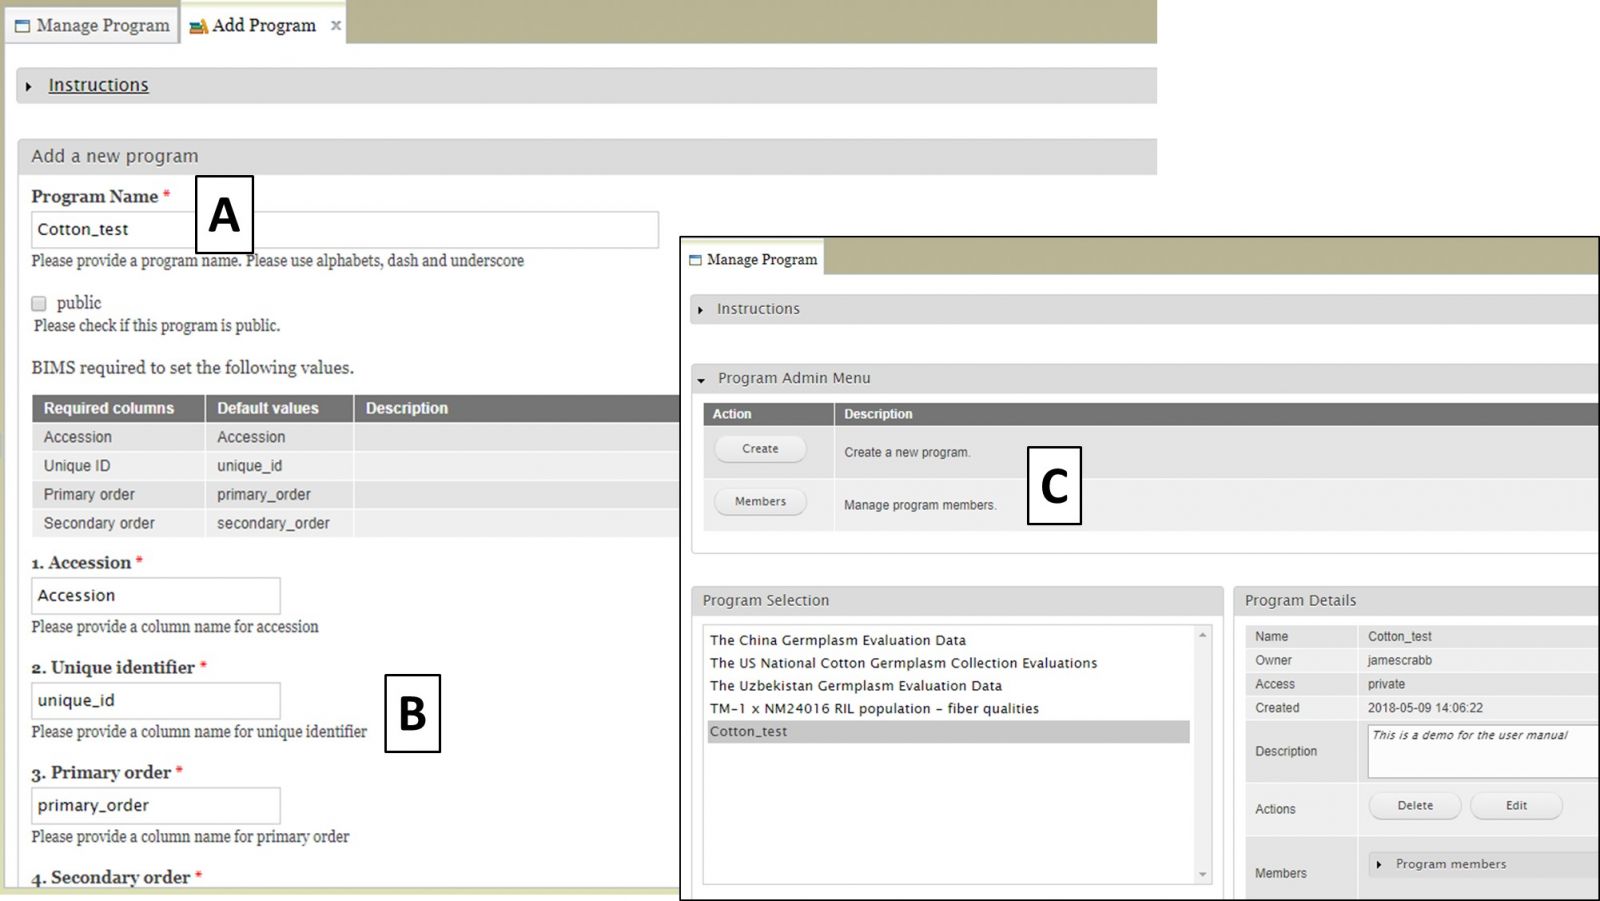
After clicking the "Create" button, the "Add Program" tab opens. Enter a new Program Name (Fig. 17A) and make sure that the required column names are set to match your dataset (Fig. 17B). These four columns are required in the phenotype sheet of the data template and if you change the column names here the column names in the phenotype sheet of the template for download will automatically change. If you use Field Book App for phenotype collection, use these column names in the input files. After you have created the program, you will have the option to add other CottonGen users as members of the breeding program (Fig. 17C). Once the program is created, data can be loaded to the program.
Figure 17. Creating a new program and adding member
BIMS: Importing Data
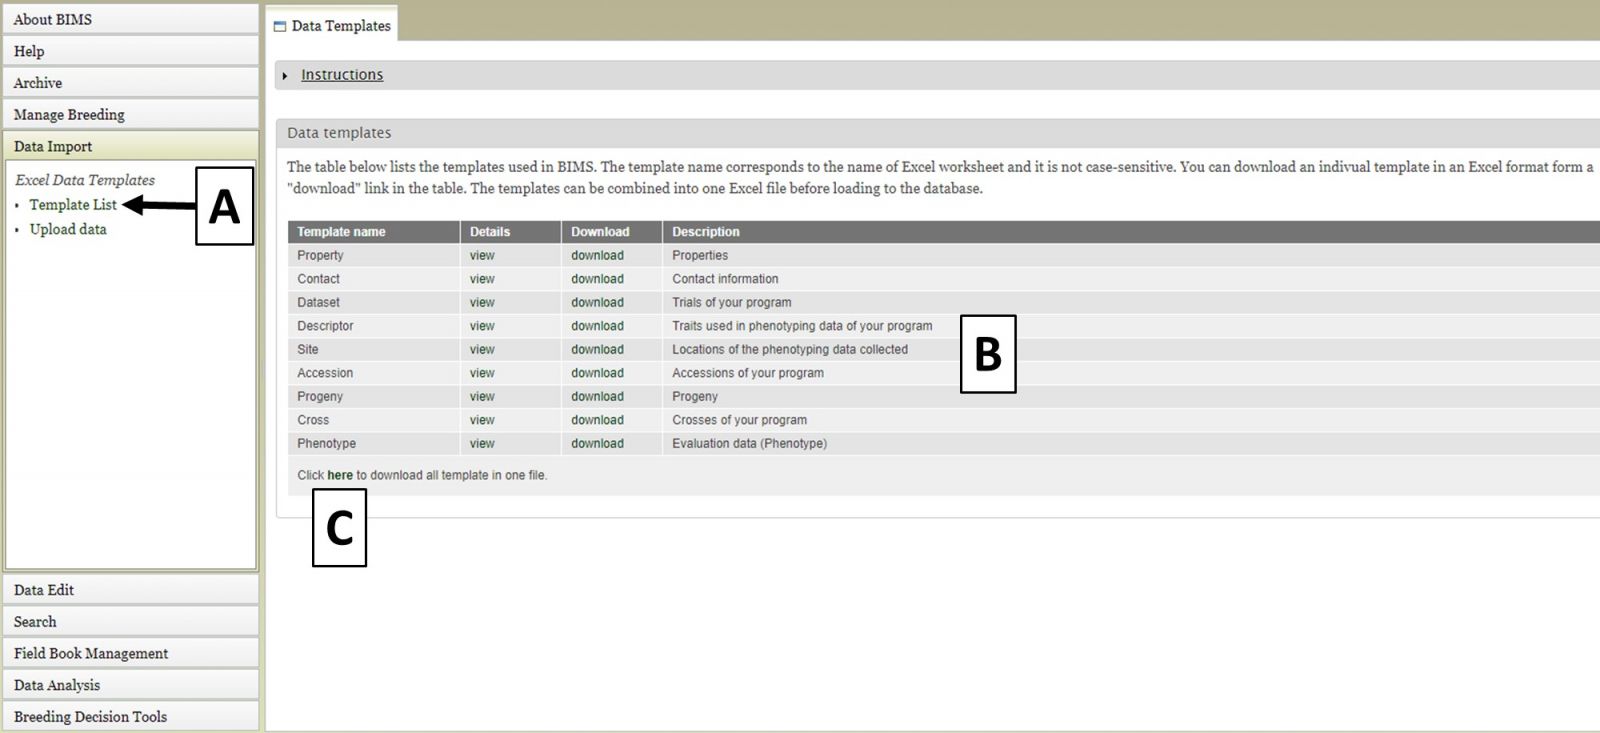
To import data into BIMS, the data need to be in BIMS templates. Phenotype data either needs to be files exported from Field Book or data entered into the BIMS templates. To download the BIMS templates, click on the "Data Import" section of the left-hand accordion menu and then click on "Template List" (Fig. 18A). You will then see the "Data Templates" tab that has information about each template and links to download the template (Fig. 18B). You can also download all the templates as a single Excel file by clicking below (Fig. 18C).
Figure 18. Downloading BIMS data templates
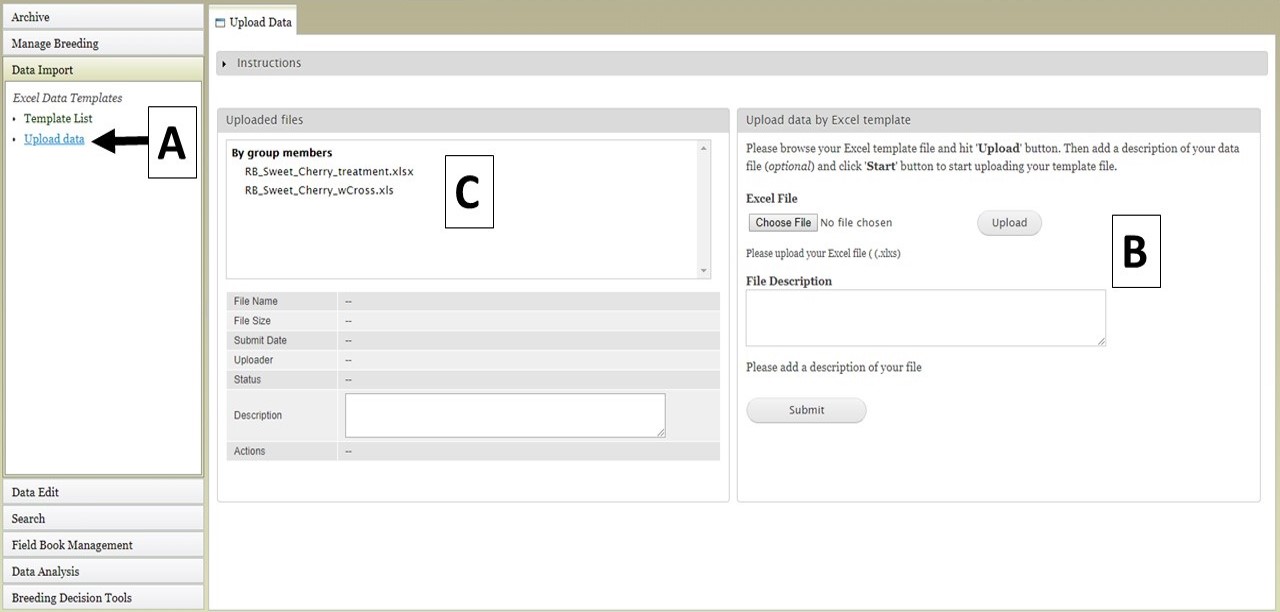
To upload data files, click on the "Upload data" link (Fig. 19A) under the "Data Import" section and the "Upload Data" tab will open. Then, under the "Upload data by Excel template" section on the right side, select the data file and click "Upload" (Fig. 19B). Enter a file description if desired, and once the file has uploaded, click "Submit". The file name will then appear in the "Uploaded Files" section (Fig. 19C).
Figure 19. Upload Data tab in BIMS
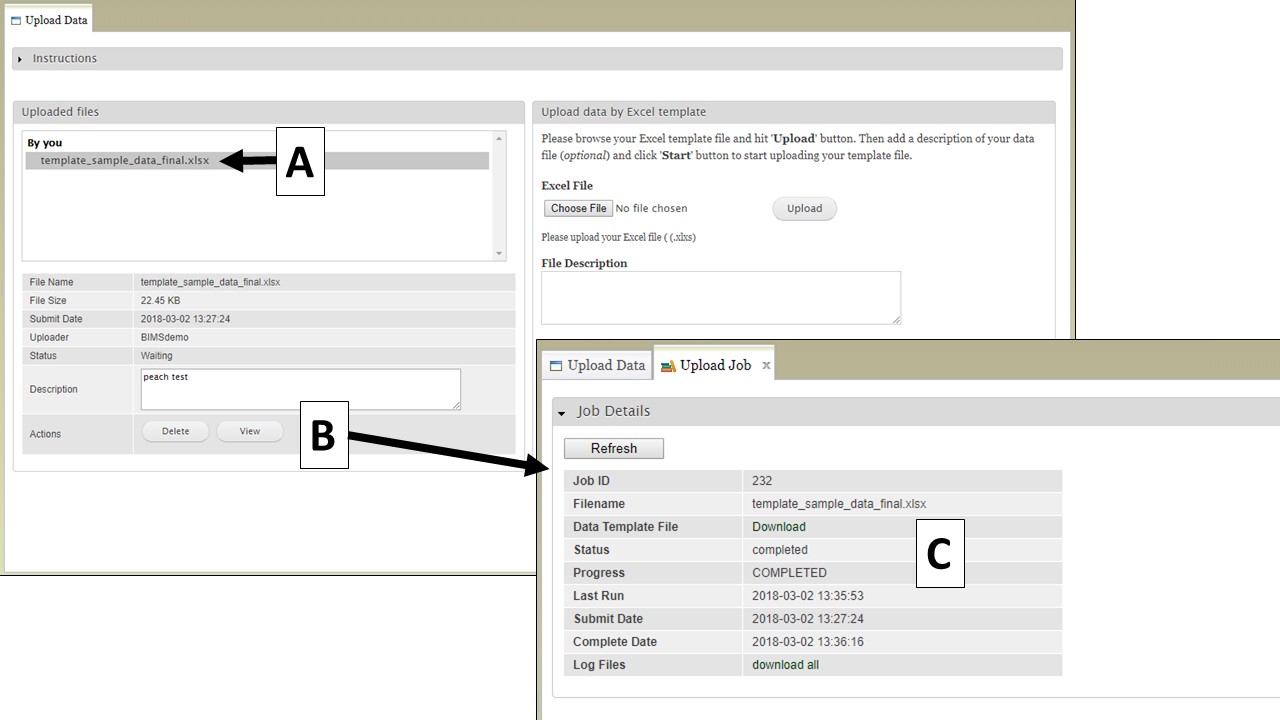
To view the progress of an upload job, click on the file name under "Uploaded files" (Fig. 20A). Summary information about the file will appear below and then click the "View" button (Fig. 20B). The "Upload Job" tab appears and will show the "Job Details" table (Fig. 20C). On the table you can see the job progress. If the job is still running, you can click the "Refresh" button to update the job progress.
Figure 20. How to view upload job progress
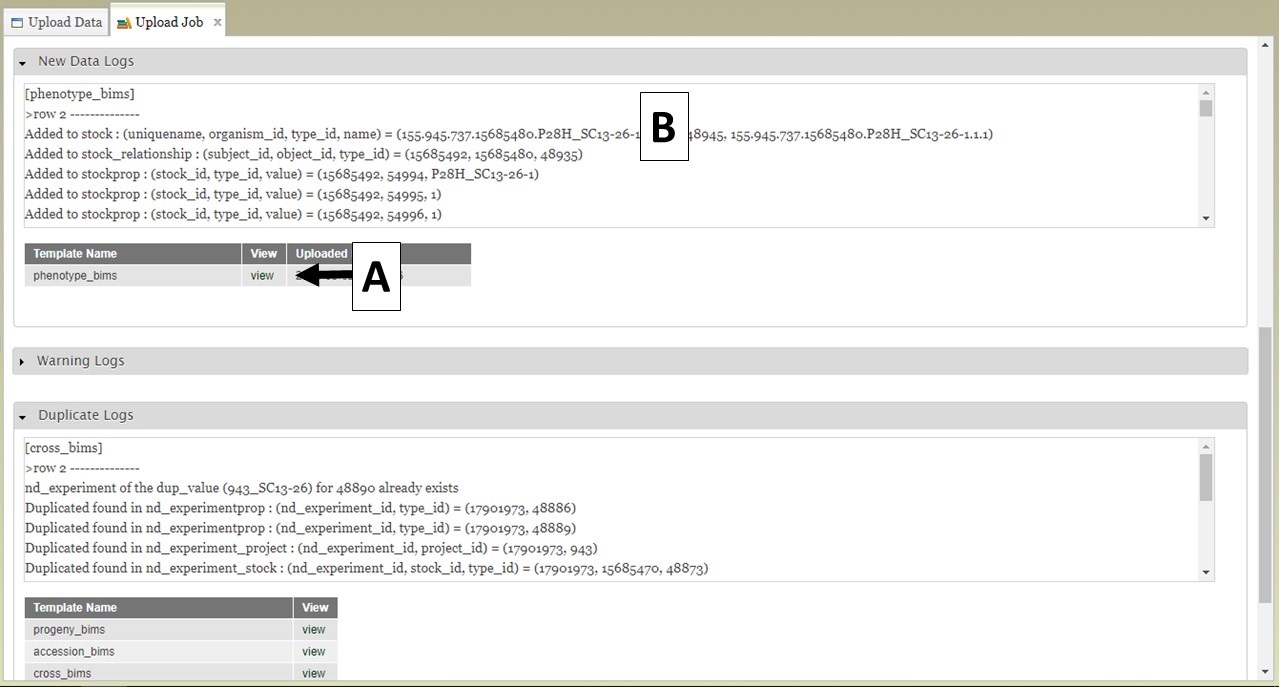
BIMS also provides links to log files on the "Upload Job" tab. When a job successfully loads, there are three types of logs: New Data Logs, Warning Logs, and Duplicate Logs. To view the logs, first expand the log type section you want to view and then click on "view" (Fig. 21A) to see the log messages (Fig. 21B). New Data Logs describe the new data that was loaded. Warning Logs indicate if any data was skipped due to incorrect column headers or typos, but this data was not critical for BIMS to load data so the job still completed. It is recommended that you look at the Warning Logs to make sure data was not omitted accidently. The Duplicate Logs display what data was a duplication of data already present in BIMS.
Figure 21. BIMS upload job logs
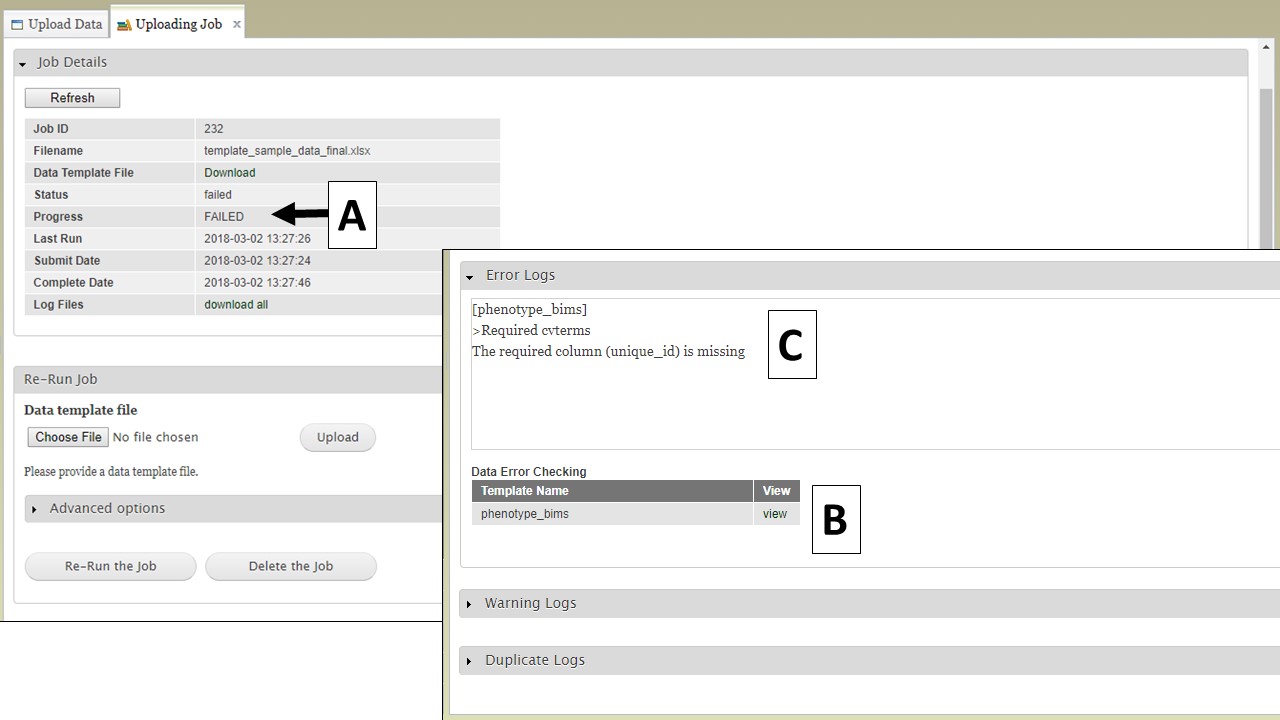
If there is an error in the data that causes the upload job to fail, you will see "FAILED" under the job progress (Fig. 22A). An Error Log section will also be available on the "Uploading Job" tab. Expand the Error Log section and click on "view" (Fig. 22B) to see the error messages (Fig. 22C). Use the Error Log information to correct the original file.
Figure 22. Failed jobs and the Error Logs
To re-run a failed job, use the "Re-Run Job" section on the "Uploading Job" tab. Select and upload the revised file (Fig. 23A) and then click the "Re-Run the Job" button (Fig. 23B). To monitor the re-run progress, click on the "Refresh" button (Fig. 23C). If the error was something that you did online, not in the template, for example you had a typo in the configuration setting, it is best not to use Re-Run Job, but go back and start the loading process again.
Figure 23. Re-running a job

BIMS: Field Book Management
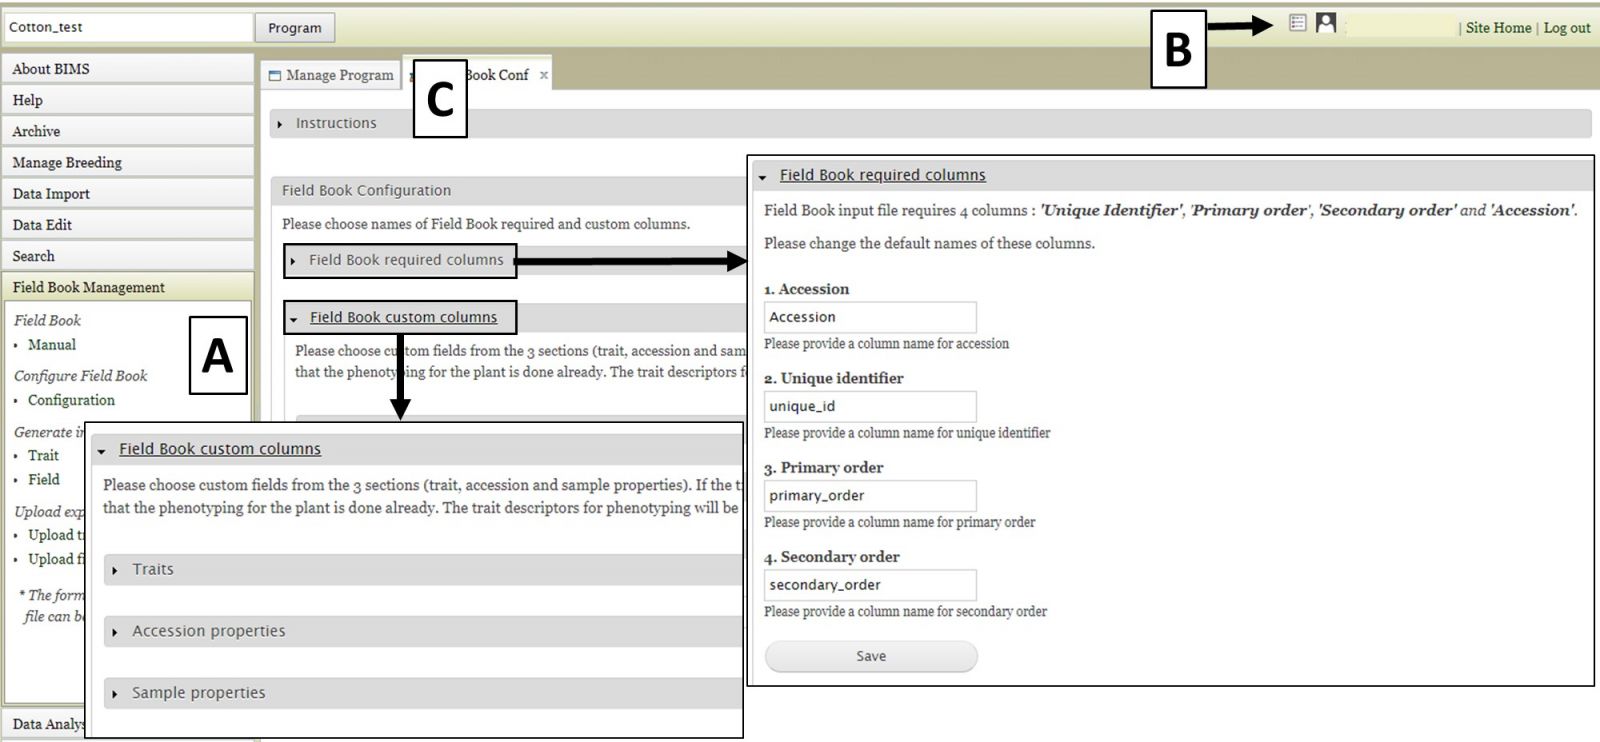
For breeders using the Field Book App, BIMS can help generate the trait and field input files to configure Field Book for data entry and BIMS can also import data in the trait and field files from Field Book. For ongoing trials, BIMS can also help breeders sync data between different devices by loading the exported data from multiple devices into BIMS and generating an input file with combined information. When breeders first create their programs, they have chosen the names for the four required columns. These columns must match the column names in the Field Book Input file. The configuration settings are accessed either by clicking on "Configuration" under the "Field Book Management" section on the left-hand accordion menu (Fig. 24A) or by clicking on the icon in the header (Fig. 24B). On the "Configuration" tab (Fig. 24C) there are two sections; "Field Book required columns" and "Field Book custom columns". The first section is to set names for Accession and the three required columns in Field Book Input file, the second section is for users to choose the optional columns that they want to add in the Field Book Input file. When they generate a Field Book Input file, these optional columns will show up for breeders to choose for each Field Book Input file that they generate.
Figure 24. Field Book configuration options
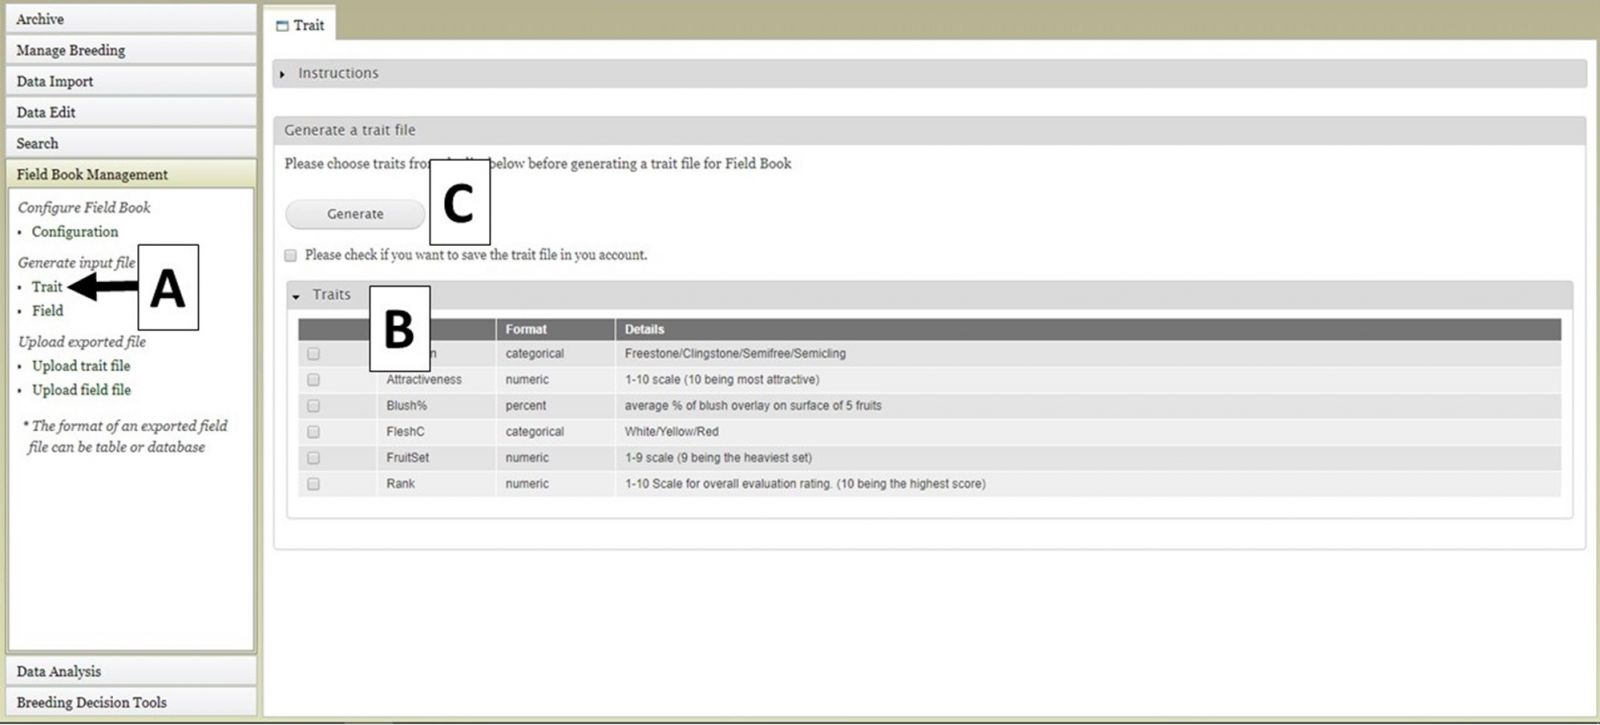
Two different file types for input into Field Book can be generated using BIMS. The first file type is the Trait (.trt) file when breeders want to add traits to Field Book using a file instead of creating them one by one in the Field Book App. This file contains the details of the phenotypic traits being recorded. To generate this file, click on "Trait" (Fig. 25A) and the "Trait" tab will open. On the "Trait" tab, there will be a list of traits that have already been loaded into the program on BIMS (Fig. 25B). Select the traits you want to export and then click the "Generate" button (Fig. 25C). A .trt file will then download.
Figure 25. Generating Trait file for Field Book
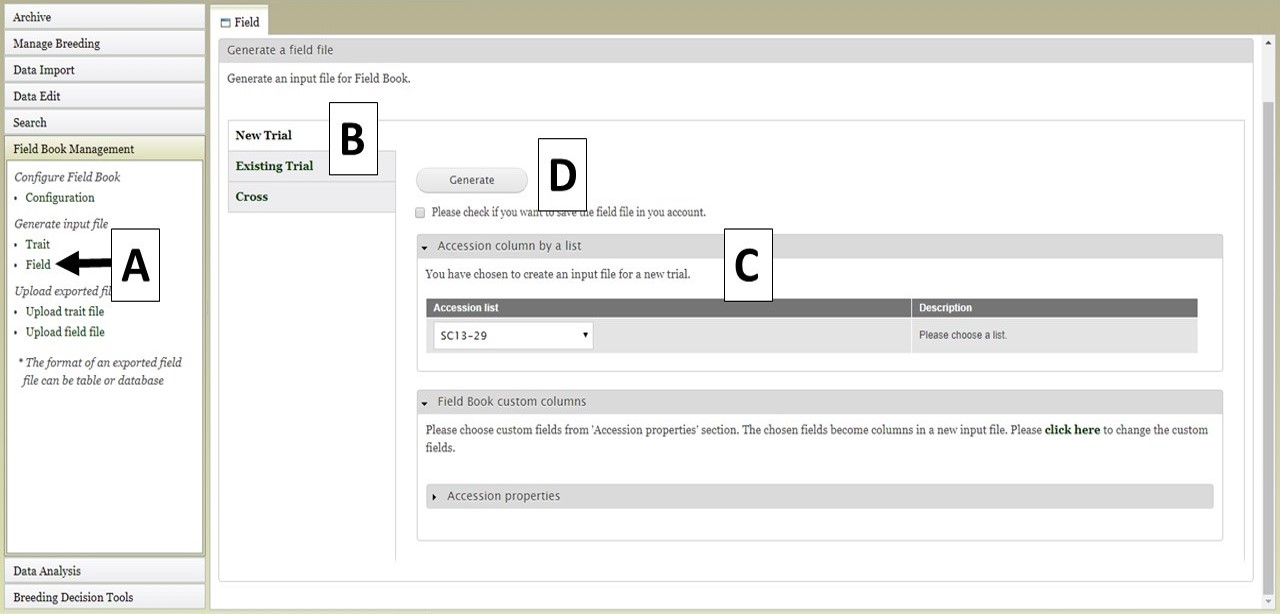
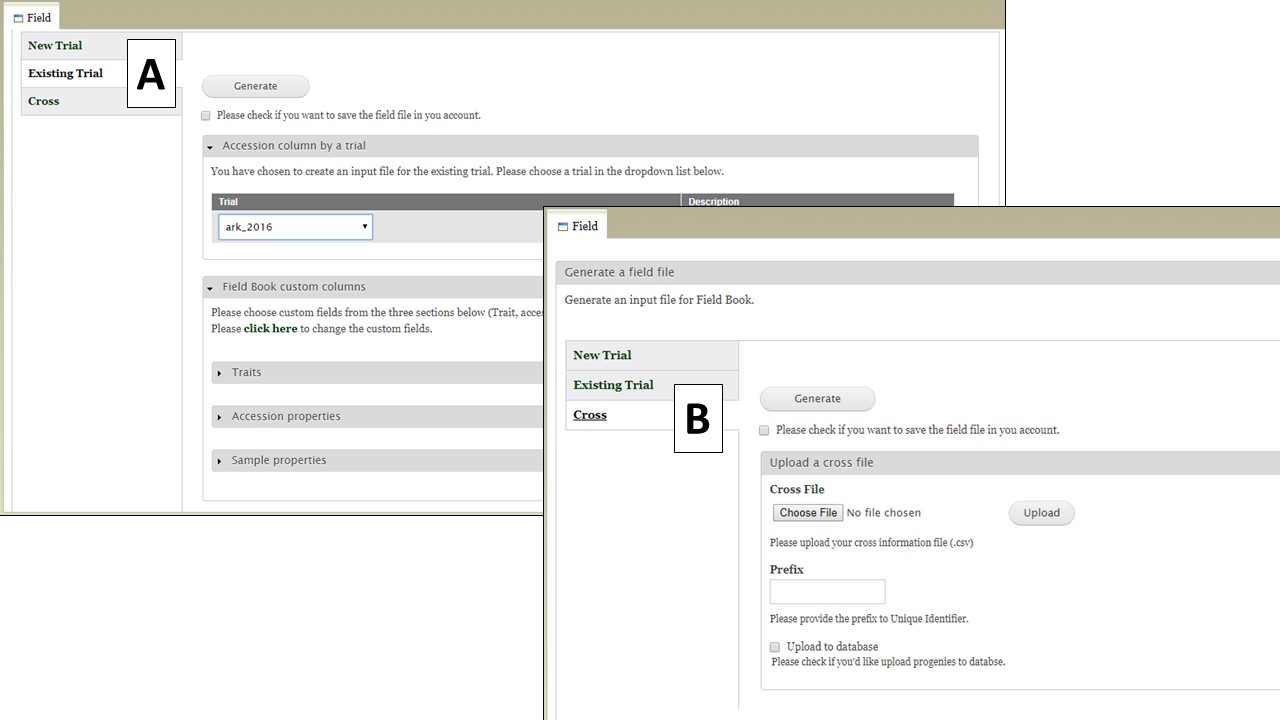
The Field file (.csv) can also be generated for import into Field Book. This file has the list of accessions and columns for the required columns (unique identifier, primary order, secondary order). The Field file is generated by clicking on "Field" (Fig. 26A) to open the "Field" tab. On the "Field" tab there are three options for generating the file (Fig. 26B). The first option is to generate a "New Trial". This can be used when breeders want to do another trail with accessions that are already in the database. If you have saved an accession list from a previous search (see Searching Data section), the option to use that list is available (Fig. 26C). You can also select other accession properties to add to the file. To generate the file, click the "Generate" button (Fig. 26D) and the file will download. In the generated file from this "New Trial" option, only the accession is provided and the three required colums (the unique identifier, primary order, and secondary order) will be empty since they depend on the planting design. The breeders should fill in those columns before importing into Field Book App.
Figure 26. Generating a Field file for a New Trial
Field files can also be generated from an Existing Trial. Files from Existing Trials (Fig. 27A) contain the accessions from the existing trial that is selected as well as the custom columns the user chooses. This functionality is to provide a way to sync data from multiple devices that have Field Book App to check which individual has been phenotyped already. Breeders can first upload the data from multiple devices, then generate an updated input file from the existing trial with a trait value.
Figure 27. Generating a Field file from an Existing Trial or Cross
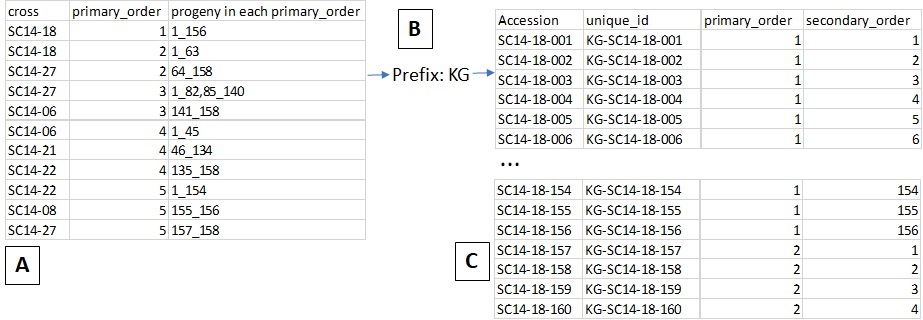
The Cross option (Fig. 28) allows you to generate an input file for a new cross. When users upload a file with information on the cross and the planting (Fig. 28A, eg. cross name, primary order, and progeny in each primary order) and type in a prefix for the unique id (Fig. 28B), then BIMS generates a Field Book input file with new progeny names and three required columns automatically filled in (Fig. 28C). In the uploaded file (Fig. 28A), the order of the columns is important, not the column head.
Figure 28. Example input file and output file for Generating a Field file for a new Cross
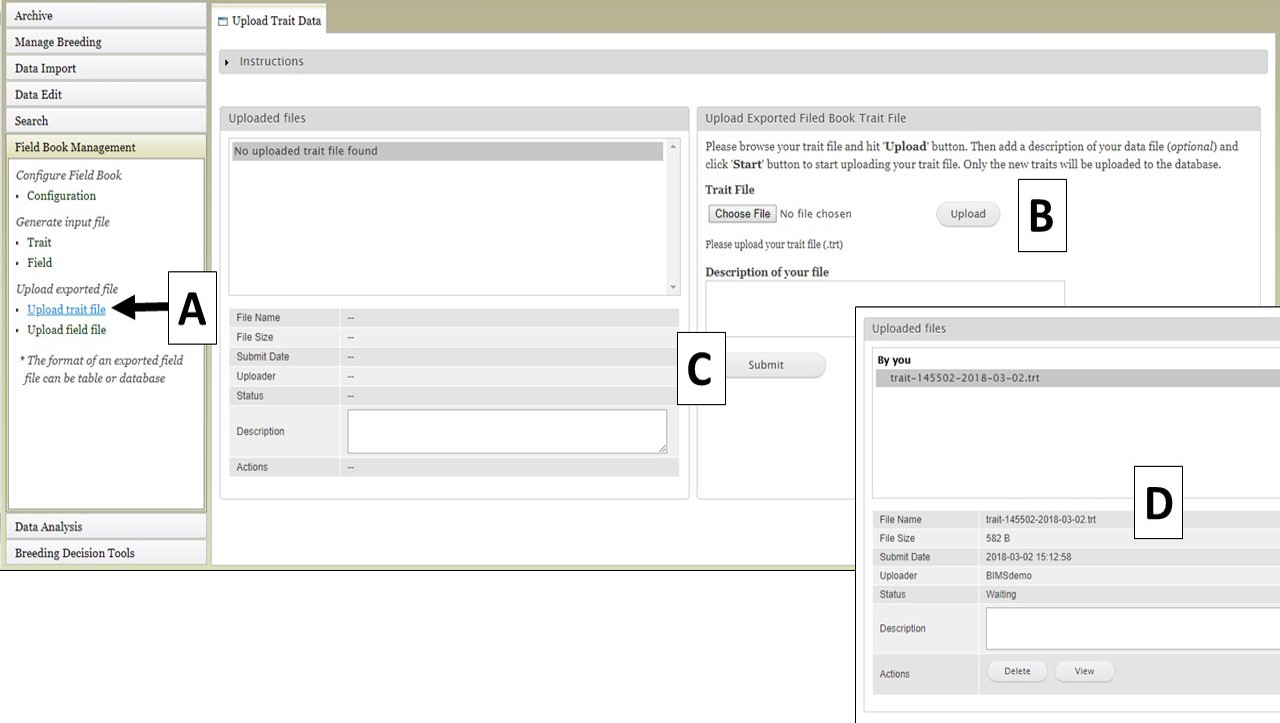
If you have already configured Field Book and would like to transfer the Trait and Field information to BIMS, that can be done by importing the Trait and Field files from Field Book. To import a Trait file, use the "Upload trait file" option (Fig. 29A). Select your file (Fig. 29B) and click "Upload." Once the file has uploaded, click "Submit" (Fig. 29C) to start the import job. The file then appears in the "Uploaded files" section (Fig. 29D).
Figure 29. Importing Trait files from Field Book into BIMS
Field files can also be imported into BIMS from Field Book. Click on "Upload field file" (Fig. 30A) and then upload the field file and click "Inspect" (Fig. 30B). After BIMS checks to see if the required columns are present in the Field file, the "Upload an exported field file" section appears (Fig. 30C) and the location and trial can be selected. The file upload job is then initiated by clicking "Submit". Successfully uploaded files will appear under "Uploaded files" (Fig. 30D).
Figure 30. Importing Field files from Field Book into BIM
.jpg)
BIMS: Archiving Data
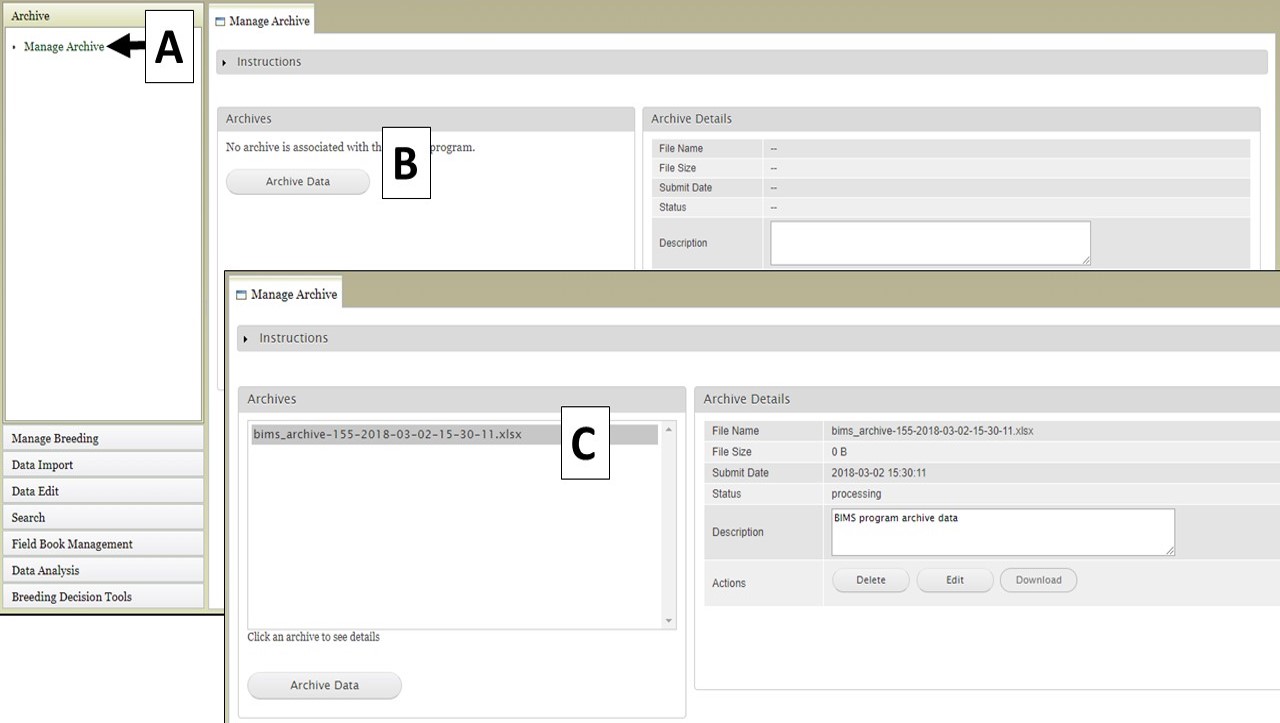
Creating an archive file of all the data in a breeding program is easily done using the "Archive" function in BIMS. Open the "Archive" section in the left-hand accordion menu, and then click "Manage Archive" (Fig. 31A). On the "Manage Archive" tab, there is an "Archive Data" button (Fig. 31B). When this button is clicked, an Excel file is generated that contains all the data in the current breeding program (Fig. 31C).
Figure 31. Generating an archive file
BIMS: FAQ and Troubleshooting
FAQ
How do I view/edit data in a program?
How do I manage Field Book trait and field files with BIMS?
How do I create a new breeding program?
Troubleshooting
| Section | Problem | Solution |
|---|---|---|
| General | I have selected a crop and program, but do not see any options under Manage Breeding and other BIMS sections. | Please refresh the page in your internet browser. |
| I still have problems with viewing BIMS information, even after refreshing the page. | Please clear the cached images/files, cookies, and hosted app data from your internet browser's history. You will have to log back into BIMS and reopen your program. | |
| Data Import/Field Book Management | My data upload failed. | Please make sure that the upload didn't fail due to data errors or typos first by looking at the error logs (see Importing Data section for more details). If you need help, contact us. |
| Even after I changed the max/min value of the trait descriptor in the template, BIMS still give an error saying that I have data outside the acceptable range. | Once your descriptor has been loaded, you have to edit the the descriptor data in BIMS, not in template (go to Manage Breeding, Trait, choose the trait and click 'Edit' .) | |
|
What do the errors below mean? The required column (unique_id) is missing |
BIMS allows you to change the column names in the template for 'accession_id', 'unique_id', 'primary_order', and 'secondary_order'. You get this type of error when the column names in your template do not match the ones in BIMS. Once you change it in BIMS, the templates downloaded from BIMS also changes. Please refer to Figure 24 in the manual. | |
| The output from Field Book Management - Generate input file (Field) - Cross option doesn't seem correct. | Please check your file if it's in the order of cross name, row and the number of progeny for each row that you will plant. In this file, the order of the columns is important, not the column head. Please refer to Figure 28 in the manual. | |
| Search | I can't download my file. | Please make sure that you allow pop-ups on your browser. Please refer to how to allow pop ups on chrome, on firefox, on internet explorer. |